Webカメラで撮影した写真をセピア調に演出するアプリを作る

コントロールの配置
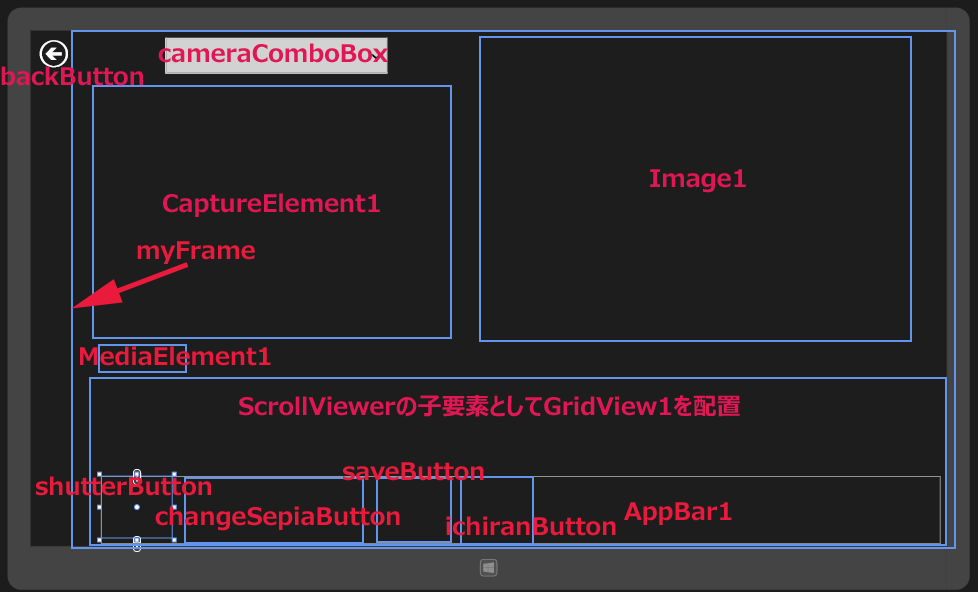
ツールボックスからデザイン画面上にWebカメラのデバイスを表示するComboBoxコントロールを1個、Webカメラからの画像を表示するCaptureElementコントロールを1個、写した写真を表示するImageコントロールを1個配置します。
次にScrollViewerコントロールを配置し、子要素としてGridViewコントロールを1個配置します。
戻る(←)ボタンとなるButtonコントロールを1個、シャッター音を鳴らすためにMediaElementコントロールを配置し、SourceプロパティにWAVフォルダ内のwavファイルを指定します。
セピア画像の一覧表示に遷移するためのFrameコントロールを1個配置しておきます。
次に、マウスの右クリックで表示される、AppBarコントロールを配置し、その子要素として、StackPanelコントロールを配置し、その子要素として、Buttonコントロールを4個配置します。
「Attach Camera」、「Sepia調に変換」、「Save Local」、「Folder」アイコンに該当するボタンです。
書き出されるXAMLコードはリスト1、レイアウトは図9のようになります。
リスト1 書き出されたXAMLコード(MainPage.xaml)
(1)名前がcameraComboBoxという
(2)名前がCaptureElement1という
(3)名前がImage1という
(4)
(5)名前がbackButtonという
(6)名前がMediaElement1という
SourceプロパティにWAVフォルダ内のwavファイルを指定します。
AutoPlayプロパティにはFalseを指定して自動再生を禁じておきます。カメラで写真を写した時のシャッター音になります。
(7)名前がmyFrameという要素を配置します。セピア調の画像の一覧ページに遷移するためのフレームです。
(8)名前がAppBar1という、
背景色にDarkGreen、Heightに100と指定しておきます。
(9)
(10)
<Page
  x:Class="SepiaImage.MainPage"
  xmlns="http://schemas.microsoft.com/winfx/2006/xaml/presentation"
  xmlns:x="http://schemas.microsoft.com/winfx/2006/xaml"
  xmlns:local="using:SepiaImage"
  xmlns:d="http://schemas.microsoft.com/expression/blend/2008"
  xmlns:mc="http://schemas.openxmlformats.org/markup-compatibility/2006"
  mc:Ignorable="d">
  <Grid Background="{StaticResource ApplicationPageBackgroundThemeBrush}">
    <ComboBox x:Name="cameraComboBox" HorizontalAlignment="Left" Height="54" Margin="200,10,0,0" VerticalAlignment="Top" Width="332"/>(1)
    <CaptureElement x:Name="CaptureElement1" HorizontalAlignment="Left" Height="384" Margin="123,82,0,0" VerticalAlignment="Top" Width="512"/>(2)
    <Image x:Name="Image1" HorizontalAlignment="Left" Height="480" Margin="666,10,0,0" VerticalAlignment="Top" Width="640"/>(3)
    <ScrollViewer  HorizontalScrollBarVisibility="Visible"  Margin="79,512,0,10">(4)
      <GridView x:Name="GridView1"  HorizontalAlignment="Left" VerticalAlignment="Center" Width="1287" FlowDirection="LeftToRight"  Height="217"/>(4)
    </ScrollViewer>(4)
    <Button x:Name="backButton" HorizontalAlignment="Left" Height="54" Margin="10,10,0,0" VerticalAlignment="Top" Width="72" Style="{StaticResource BackButtonStyle}"/>(5)
    <MediaElement x:Name="MediaElement1" HorizontalAlignment="Left" Height="37" Margin="123,490,0,0" VerticalAlignment="Top" Width="110" AutoPlay="False" Source="WAV/k1000.wav"/>(6)
    <Frame x:Name="myFrame" HorizontalAlignment="Left" Height="763" Margin="79,5,0,0" VerticalAlignment="Top" Width="1277"/>(7)
    <AppBar x:Name="AppBar1" Background="DarkGreen" Height="100" Margin="96,665,0,3">(8)
      <StackPanel Orientation="Horizontal">(9)
        <Button x:Name="shutterButton"  HorizontalAlignment="Left" Height="91"  VerticalAlignment="Top" Width="104"  Style="{StaticResource AttachCameraAppBarButtonStyle}" IsEnabled="False"/>(10)
        <Button x:Name="changeSepiaButton" HorizontalAlignment="Left" Height="91"  VerticalAlignment="Top" Width="255"  IsEnabled="False" Content="Sepia調に変換" FontFamily="Meiryo UI" FontSize="24" FontWeight="Bold"/>(10)
        <Button x:Name="saveButton"  HorizontalAlignment="Left" Height="91"  VerticalAlignment="Top" Width="104"  Style="{StaticResource SaveLocalAppBarButtonStyle}" IsEnabled="False"/>(10)
        <Button x:Name="ichiranButton"  HorizontalAlignment="Left" Height="91"  VerticalAlignment="Top" Width="104"  Style="{StaticResource FolderppBarButtonStyle}" IsEnabled="False"/>(10)
      </StackPanel>(9)
    </AppBar>(8)
  </Grid>
</Page>
「空白のページ」の作成(IchiranShowPage.xaml)
セピア調の画像の一覧を表示するページです。
VS2012のメニューの「プロジェクト(P)/新しい項目の追加(W)」と選択します。
「新しい項目の追加」ダイアログボックスが開きますので、「空白のページ」を選択します。「名前(N)」にIchiranShowPage.xamlと入力し、[追加(A)]ボタンをクリックします。
コントロールの配置
ツールボックスからScrollviewerコントロールを配置し、その子要素としてGridViewコントロールを配置します。
書き出されるXAMLをリスト2のように編集します。レイアウトは図10のようになります。
リスト2 書き出され編集されたXAMLコード(IchiranShowPage.xaml)
(1)
<Page
  x:Class="SepiaImage.IchiranShowPage"
  xmlns="http://schemas.microsoft.com/winfx/2006/xaml/presentation"
  xmlns:x="http://schemas.microsoft.com/winfx/2006/xaml"
  xmlns:local="using:SepiaImage"
  xmlns:d="http://schemas.microsoft.com/expression/blend/2008"
  xmlns:mc="http://schemas.openxmlformats.org/markup-compatibility/2006"
  mc:Ignorable="d">
  <Grid Background="{StaticResource ApplicationPageBackgroundThemeBrush}">
    <ScrollViewer HorizontalScrollBarVisibility="Visible">(1)
      <GridView x:Name="GridView1"  HorizontalAlignment="Left" VerticalAlignment="Center" FlowDirection="LeftToRight" Height="600" Width="1365"/>(1)
    </ScrollViewer>(1)
  </Grid>
</Page>

次に、ソリューションエクスプローラー内のMainWindow.xamlを展開して表示される、MainWindow.xaml.vbをダブルクリックしてリスト3のコードを記述します。
ロジックコードを記述する
リスト3 (MainWindow.xaml.vb)
写真、オーディオ録音、ビデオなどをキャプチャするクラスを提供する、Windows.Media Captrue名前空間をインポートします。
Imports Windows.Media.Capture
ファイル、フォルダおよびアプリケーションの設定を管理するクラスの含まれる、Windows.Storage名前空間をインポートします。
Imports Windows.Storage
メディア形式のプロパティが作成された時に必要となるクラス、およびほかのプログラミング要素を提供するクラスの含まれる、Windows.Media.MediaProperties名前空間をインポートします。
Imports Windows.Media.MediaProperties
シーケンシャルアクセスストリーム、およびランダムアクセスストリームに対する読み取りと書き込みのサポートを提供するクラスの含まれる、Windows.Storage.Streams名前空間をインポートします。
Imports Windows.Storage.Streams

Imports Windows.UI
Imports Windows.UI.Popups
デバイスを列挙するためのクラスを提供する、Windows.Devices.Enumeration名前空間をインポートします。
Imports Windows.Devices.Enumeration
WriteableBitmapEffectorの使用を可能にするために、Softbuild.Media名前空間をインポートしておきます。画像をSepia調に変換するには、この名前空間に含まれるクラスを使用します。
Imports Softbuild.Media
アプリケーションウインドウやウインドウ対話を作成し管理するサポートと、Windows上の入力イベントをサポートする処理を提供するクラスの含まれる、Windows.UI.Core名前空間をインポートします。
Imports Windows.UI.Core

Public NotInheritable Class MainPage
  Inherits Page
インデックスによってアクセスできる要素の読み取り専用コレクションを表す、IstorageFile型のメンバ変数myPictureFilesを宣言します。
Dim myPictureFiles As IReadOnlyList(Of IStorageFile)
フォト、オーディオ録音およびビデオをキャプチャする、新しいMediaCaptureクラスのインスタンス、myMediaCaptureメンバ変数を宣言します。
  Dim myMediaCapture As MediaCapture

  Dim Index As Integer
BitmapImageクラス型のメンバ変数saveBmpを宣言します。
Dim saveBmp As BitmapImage
DeviceInformationオブジェクトのコレクションを表すメンバ変数myCameraを宣言します。
  Dim myCamera As DeviceInformationCollection

  Dim myImageFileName As String
  Dim no As Integer = 0
  Dim myIndex As Integer = 0
文字列型の新しいリストであるfileNameListメンバ変数を宣言します。
Dim fileNameList As New List(Of String)
WriteableBitmapクラス型のメンバ変数mySourceを宣言します。WriteableBitmapクラスは、書き込みおよび更新が可能な BitmapSource を提供するクラスです。
 Dim mySource As WriteableBitmap

 Dim cameraNo As Integer = -1
ページがアクティブになった時の処理
カメラのデバイスを取得し、ピクチャライブラリ内のセピア画像を取得する、DataShowプロシージャを実行します。
AddHandlerステートメントで、現在アクティブ化されているウインドウのVisibleプロパティの値が変更された時に発生するVisibilityChangedイベントに、イベントハンドラを指定します。
  Protected Overrides Sub OnNavigatedTo(e As Navigation.NavigationEventArgs)
    DataShow()
    AddHandler Window.Current.VisibilityChanged, AddressOf Current_Changed
    MyBase.OnNavigatedTo(e)
  End Sub
現在アクティブ化されているウインドウのVisibleプロパティの値が変更された時に発生する処理
Webカメラはバックグラウンドにまわって、フォアグラウンドに戻った時、その処理を停止し、Webカメラが動作しなくなりますので、この処理が必要です。
Webカメラがバックグラウンドからフォアグラウンドに戻った場合は、再度新しいMediaCaptureのインスタンスを作成する、CameraRestartプロシージャを実行します。
  Private Sub Current_Changed(sender As Object, e As VisibilityChangedEventArgs)
    If e.Visible = True Then
      CameraRestart()
   End Sub
Webカメラがバックグラウンドからフォアグラウンドに移った際、再度新しいMediaCaptureのインスタンスを作成する処理
メンバ変数myMediaCaptureにCaptureElementのSourceプロパティの値を指定し、新しいMediaCaptureのインスタンスを作成します。
InitializeAsyncメソッドで、以下の内容でMediaCaptureオブジェクトを初期化します。
新しいMediaCaptureInitializationSettingsクラスのインスタンスを作成します。MediaCaptureInitializationSettingsクラスは、MediaCaptureオブジェクトの初期化設定をするクラスです。
VideoDevideIdプロパティにcameraComboBoxから選択されたインデックスに対応する、コレクション変数myCameraのデバイスIDを指定します。
CaptureElement1のSourceプロパティにデバイスIDで初期化されたmyMediaCaptureを指定します。
StartPreviewAsyncメソッドでプレビューを開始します。これで、Webカメラの画像が表示されます。
非同期処理で行われるため、メソッドの先頭にAsyncを追加します。
 Private Async Sub CameraRestart()
  myMediaCapture = CaptureElement1.Source
  myMediaCapture = New MediaCapture

  Try
    Await myMediaCapture.InitializeAsync(New MediaCaptureInitializationSettings With {.VideoDeviceId = myCamera(cameraComboBox.SelectedIndex).Id})
    CaptureElement1.Source = myMediaCapture
    Await myMediaCapture.StartPreviewAsync
  Catch
    Exit Sub
  End Try
End Sub
セピア調の写真を作るアプリ