TypeScript×Node.jsでCLIを開発してnpmで公開する基本手順を学ぶ
はじめに
こんにちは。サイバーエージェントのソフトウェアエンジニアの平井柊太(@did0es)です。
前回は、本連載を読み進めるにあたって理解しておくと役に立つ用語の整理や、Node.jsでTypeScriptを動かすための環境構築を行いました。
今回は、TypeScriptによるCLIの開発と、開発したCLIを誰でも使えるように公開する方法を紹介します。
今回作るものと開発に必要なツール
何らかの入力に対して、結果を出力するようなCLIツールを実装します。入力はキーボードから受け取ります。以下のようにコマンドの引数として受け取る方法や、コマンドを実行すると起動する対話型環境でユーザーが選択した結果を受け取る方法があります。

引数として入力を受け取るCLI
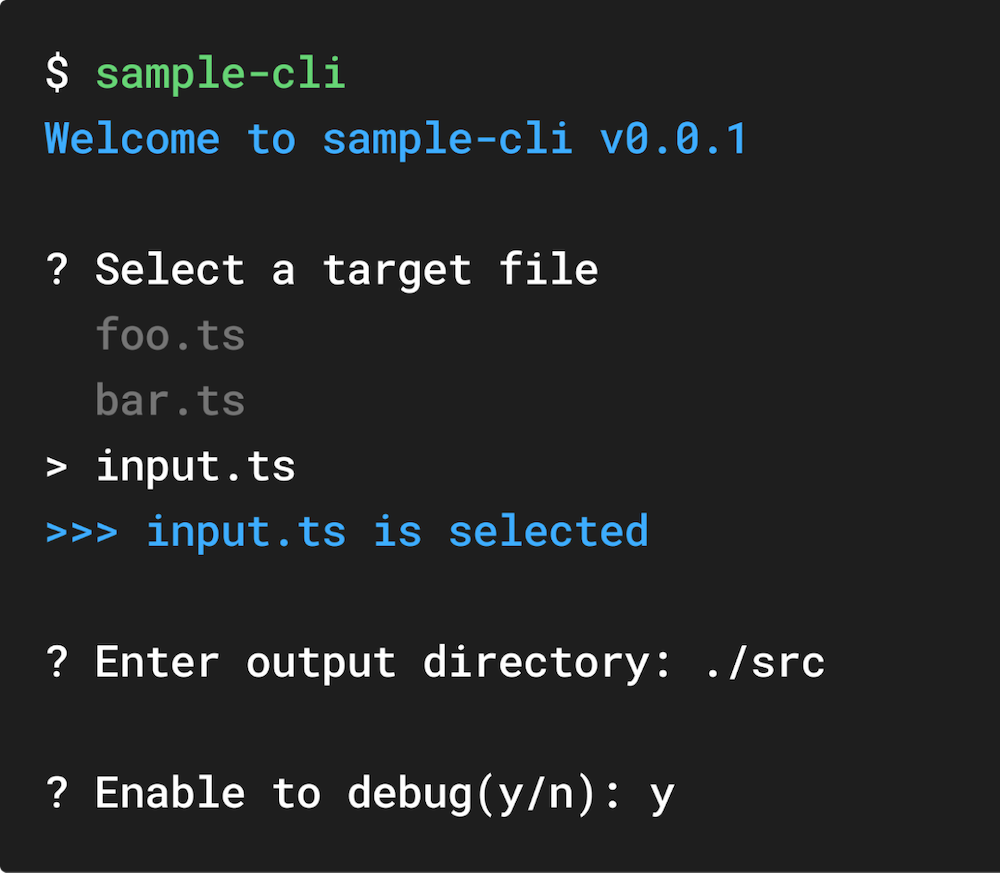
対話型環境の選択結果を入力として受け取るCLI
Node.jsによるCLIの実装には、以下をはじめとするライブラリが用いられます。
こういったライブラリは非常に有用ですが、今回はNode.jsのAPIだけでコマンドの引数や対話型環境から入力を受け取るCLIを実装します。対話型CLIの実装にはreadlineというAPIを用います。readlineにより入力を1行ずつ読み取れ、対話型のCLIを実現できます。
ドキュメントにあるreadlineのサンプルコードを動かして、どういった挙動をするのか概観してみましょう。
Node.jsは今までと同様にv23.10.0を使います。前回作成した作業用ディレクトリ(build-your-own-ast-tools-by-typescript)の中に、以下で新たなディレクトリを作成します。
mkdir -p build-your-own-ast-tools-by-typescript/002-create-cli
cd build-your-own-ast-tools-by-typescript/002-create-cli
ディレクトリの中でnpm CLIを用いて、以下でプロジェクトを初期化します。npm CLIはJS向けのパッケージマネージャーで、Node.jsをインストールすると自動でインストールされるツールです。タスクの実行やパッケージのインストールなどが行えます。
npm init -y
初期化が完了するとpackage.jsonというnpm CLI向けのコンフィグファイルが生成されます。CLIはサンプルコードと同様にES Modulesで開発するためpackage.jsonにtypeフィールドを追加します。"module"を指定するとES Modulesが有効化されます。
{
  "name": "002-create-cli",
  // ~~~
  "type": "module"
}
それでは、002-create-cliディレクトリの中にsampleCli.tsファイルを作成し、以下を記述してください。
import * as readline from 'node:readline/promises';
import { stdin as input, stdout as output } from 'node:process';

const rl = readline.createInterface({ input, output });

const answer = await rl.question('What do you think of Node.js? ');

console.log(`Thank you for your valuable feedback: ${answer}`);

rl.close();
記述する際にエディタによっては型エラーが出ますが、実行に影響はありません(「CLIを開発する」パートで、この型エラーへの対処法を紹介します)。なお、このサンプルコードはES Modulesで記述しています。詳細はドキュメントを参照してください。
前回と同様に、node.config.jsonファイルを今回の作業用ディレクトリに作成します。以下の内容を含めましょう。
{
  "$schema": "https://nodejs.org/dist/v23.10.0/docs/node-config-schema.json",
  "nodeOptions": {
    "disable-warning": ["ExperimentalWarning"],
    "experimental-transform-types": true,
    "experimental-detect-module": true
  }
}
sampleCli.tsファイルを実行すると、以下のように質問が表示され、入力に基づいた結果を出力できます。

readlineのサンプルコードの実行結果
CLIを開発する
前項で紹介したAPIをベースに、様々な入力から出力を行うCLIを実装していきます。
プロジェクトをセットアップ
はじめに、プロジェクトのセットアップを行い、前項で発生していたサンプルコードの型エラーを修正しましょう。npm CLIのinstallコマンドで、Node.js向けの型定義をインストールします。以下を実行すると、DefinitelyTypedという型定義プロジェクトからNode.jsの型定義が追加されます。
npm install -D @types/node
@types/nodeはnpm installコマンドのDオプションにより、package.jsonのdevDependenciesフィールドに追加されます。本記事では、@types/nodeのv22.15.30を利用します。
{
  // ~~~
  "devDependencies": {
	"@types/node": "^22.15.30"
  }
}
次項の「CLIを公開する」で触れますが、devDependenciesフィールドに追加されたパッケージは、公開したパッケージの依存に含まれません。型定義やLinter、Formatterなど、開発だけで必要なパッケージをここにインストールしましょう。sampleCli.tsファイルをエディタで開き直し、型エラーがなくなっていれば完了です。
併せて、型チェックの準備をしましょう。Node.js CLIには型チェックの機能がなく、TypeScriptをそのまま実行してしまいます。型チェックのために、以下でTypeScriptをインストールします。TypeScriptのCompiler(tsc)を用いて、型チェックの他にCLIを公開するためのビルドが行えます。
npm install -D typescript
以下で、TypeScriptをセットアップします。
npx tsc --init
セットアップが完了すると、tsconfig.jsonというTypeScript向けのコンフィグファイルが生成されます。tsconfig.jsonファイルを以下のように書き換えます。
{
  "compilerOptions": {
	"target": "esnext",                     	// 出力するJavaScriptのバージョンを最新(ESNext)に設定
	"module": "ESNext",                     	// モジュール形式をES Modulesに設定。import/exportを保持して出力
	"moduleResolution": "bundler",          	// モジュール解決方法をバンドラ(Vite, esbuildなど)向けに最適化。拡張子付きimportも許可
	"outDir": "./dist",                     	// トランスパイルされたJavaScriptファイルの出力先フォルダをdistに
	"rootDir": "./",                        	// ソースファイルのルートディレクトリを指定
	"forceConsistentCasingInFileNames": true,   // import時のファイル名の大文字・小文字の不一致をエラーにする(OS差によるバグ防止)
	"strict": true,                         	// 厳格な型チェックオプションを有効にする
	"allowImportingTsExtensions": true,     	// 拡張子付きのTypeScriptファイルのimportを許可
	"rewriteRelativeImportExtensions": true,	// 相対パスのimportで拡張子を自動的に追加
  },
  "include": ["**/*.ts"],                   	// サブフォルダを含むすべての.tsファイルを対象にする
  "exclude": ["node_modules", "dist"]       	// node_modulesと出力先のdistフォルダは対象外にする
}
それぞれのオプションや設定については、コメントアウトやドキュメントを参照してください。
package.jsonのscriptsフィールドにtypecheckフィールドを追加します。
{
  "name": "002-create-cli",
	// ~~
  "scripts": {
	"typecheck": "tsc --noEmit"
  },
  // ~~~
}
npm run typecheckを実行すると型チェックが行われます。noEmitオプションが有効化されているため、JavaScriptへのトランスパイルは発生しません。
#noEmit$ npm run typecheck

> 002-create-cli@1.0.0 typecheck
> tsc --noEmit
エラーがない場合は特に出力はありません。試しに、型エラーが起きるようにsampleCli.tsファイルを書き換えてみます。
import * as readline from 'node:readline/promises';

// ~~~

const str: string = 0; // 型エラーが起きる
型チェックを実行して以下のエラーが発生すれば、TypeScriptのセットアップは完了です。
$ npm run typecheck

> 002-create-cli@1.0.0 typecheck
> tsc --noEmit

sampleCli.ts:12:7 - error TS2322: Type 'number' is not assignable to type 'string'.

12 const str: string = 0;
     	~~~

Found 1 error in sampleCli.ts:12
確認できたら、sampleCli.tsファイルは型エラーのない元の状態に戻しておきましょう。
引数から入力を受け取るCLIを実装する
basicCli.tsファイルを作成し、以下を追加します。
#!/usr/bin/env node

console.log("Welcome to the Basic CLI!");
#!/usr/bin/env nodeはshebangという記述で、OSがファイルから実行環境(node)を判別できるようになります。
package.jsonのscriptsフィールドにbuildフィールドを追加します。また、開発中はnodeで直接TypeScriptファイルを実行して確認できるようにdevフィールドも追加します。
{
  "name": "002-create-cli",
  // ~~~
  "scripts": {
	"dev": "node --experimental-default-config-file",
	"build": "tsc",
	"typecheck": "tsc --noEmit"
  },
  // ~~~
}
npm run buildでビルドしてみましょう。distディレクトリが生成され、その中にトランスパイルされたJavaScriptが出力されます。
dist
├── basicCli.js
└── sampleCli.js
package.jsonにbinフィールドを追加し、以下を記述します。これで、CLIコマンドとしてローカルで実行できます。
{
  "name": "002-create-cli",
  // ~~~
  "bin": {
	"basic-cli": "dist/basicCli.js"
  },
  // ~~~
}
ターミナルからnpx basic-cliを実行し、以下が出力されれば完了です。
$ npx basic-cli
Welcome to the Basic CLI!
開発時はnpm run dev -- ./basicCli.tsのように、ファイルを直接実行して確認できます。
それでは、冒頭に登場したsample-cliのように、以下のフォーマットで実行できるコマンドを実装してみましょう。
basic-cli <入力するファイルのパス> [オプション] # [オプション]: --out, --debug
まずは、出力用にconsoleオブジェクトをラップしたconsole.tsファイルを作成します。
export function error(message: string): void {
  console.error(`[ERROR] ${message}`);
}

export function info(message: string): void {
  console.log(`[INFO] ${message}`);
}

export function warn(message: string): void {
  console.warn(`[WARN] ${message}`);
}

export function success(message: string): void {
  console.log(`[SUCCESS] ${message}`);
}

export function debug(message: string): void {
  if (process.env.DEBUG === 'true') {
	console.log(`[DEBUG] ${message}`);
  }
}
何らかの処理が成功したのか、失敗したのか、デバッグで出力したものは何なのかなどがひと目で分かるようになります。適宜他のファイルでimportして利用します。
basicCli.tsファイルに以下を記述します。
#!/usr/bin/env node

// Node.jsのモジュールをインポート
import fs from 'node:fs/promises';
import path from 'node:path';
// カスタムコンソールモジュールをインポート
import { debug, error, info } from './console.ts';

console.log('Welcome to the Basic CLI!');

const helpMessage =
  'Usage: basic-cli <file-path> [--out <output-path>] [--debug]';

// コマンドの引数を取得(0番目はnodeの実行パス、1番目はスクリプトのパスなので省く)
const args = process.argv.slice(2);
// 引数が不足している場合はヘルプメッセージを表示
if (args.length === 0) {
  info(helpMessage);
  process.exit(1);
}
Node.jsのAPIのfs(fs/promises)とpath、先ほど作成したconsole.ts内から必要な関数をimportします。
Node.jsではprocess.argvから実行時の引数にアクセスできます。引数は配列で格納されており、0番目はnodeのパス、1番目は実行したファイルのパスなので、これらを削ったものがコマンドの引数(args変数)になります。
npm run dev -- ./basicCli.tsを実行してみましょう。コマンドに引数を何も渡さない場合、ヘルプメッセージを出力するとともに process.exit(1)で異常系として終了します。
$ npm run dev -- ./basicCli.ts

> 002-create-cli@1.0.0 dev
> node --experimental-default-config-file ./basicCli.ts

Welcome to the Basic CLI!
[INFO] Usage: basic-cli <file-path> [--out <output-path>] [--debug]
basicCli.tsファイルの続きに、コマンドに引数が渡された場合の正常系の処理を追加します。
// ~~~
if (args.length === 0) {
  info(helpMessage);
  process.exit(1);
}

// --- 以下を追加 ---
let [inputFilePath, ...restArgs] = args;
// コマンドの1つ目の引数に、入力ファイルパスが指定されていない場合はエラーにする
if (!inputFilePath || inputFilePath.startsWith('--')) {
  error('Input file path is required');
  info(helpMessage);
  process.exit(1);
}

let outputFilePath = '';
for (let i = 0; i < restArgs.length; i++) {
  const arg = restArgs[i];

  if (arg === '--out') {
	// --outオプションが指定された場合、次の引数を出力ファイルパスとして取得する
	// 次の引数がない、または次の引数がオプション形式(--で始まる)ならエラーにする
	if (i + 1 >= args.length || restArgs[i + 1].startsWith('--')) {
  	error('--out requires a file path');
  	process.exit(1);
	}
	outputFilePath = restArgs[++i];
  } else if (arg === '--debug') {
	// --debugオプションが指定された場合、デバッグモードを有効にする
	process.env.DEBUG = 'true';
  } else {
	error(`Unknown argument: ${arg}`);
	process.exit(1);
  }
}
args配列のうち、初めの要素は入力ファイルパスとして扱います。残りの要素はrestArgsとして順番に走査します。
--outが入力された場合、その直後には出力先ディレクトリをセットする必要があります。そこでi + 1 >= args.length || args[i + 1].startsWith('--')の条件でバリデートします。次に、outputFilePath = restArgs[++i]で出力先ディレクトリをoutputFilePathに格納します。最後にi変数をインクリメントして、次の引数に処理を移します。
--debugが入力された場合、process.envにあるDEBUG環境変数に"true"をセットします。これはconsole.tsファイルのdebug関数で以下のように参照されます。
export function debug(message: string): void {
  if (process.env.DEBUG === 'true') {
	console.log(`[DEBUG] ${message}`);
  }
}
どのオプションにも該当しないものが入力された場合、異常系として終了します。
$ npm run dev -- ./basicCli.ts ./sampleCli.ts --foobar

> 002-create-cli@1.0.0 dev
> node --experimental-default-config-file ./basicCli.ts ./sampleCli.ts --foobar

Welcome to the Basic CLI!
[ERROR] Unknown argument: --foobar
最後にbasicCli.tsファイルの続きに入力ファイルを読み取り、別のファイルを出力する処理を追加します。
	error(`Unknown argument: ${arg}`);
	process.exit(1);
  }
}

// --- 以下を追加 ---
// 入力ファイルを読み込む
try {
  const absoluteInputPath = path.resolve(inputFilePath);
  const data = (await fs.readFile(absoluteInputPath)).toString();

  debug(`Input file path: ${absoluteInputPath}`);
  debug(`Input file content:\n${data}`);

  const reversedData = data.split("").reverse().join("");
  if (outputFilePath) {
	// 出力ファイルパスが指定されている場合、内容を逆順にしてファイルに書き込む
	const absoluteOutputPath = path.resolve(outputFilePath);
	await fs.writeFile(absoluteOutputPath, reversedData);
	debug(`Output written to: ${absoluteOutputPath}`);
  } else {
	// 出力ファイルパスが指定されていない場合、コンソールに出力する
	info(`Reversed file content:\n${reversedData}`);
  }
} catch (err) {
  if (err instanceof Error) {
	error(err.message);
  } else {
	error('An unknown error occurred');
  }
  process.exit(1);
}
path.resolveで入力ファイルの絶対パスを取得し、fs.readFileで内容を取得します。なお、ES ModulesではTop-level Awaitが可能で、awaitをasync付きの関数で囲う必要がありません。
outputFilePathが指定されている場合は、入力ファイルの文字列を逆順に並び替えてfs.writeFileで書き込みます。sampleCli.tsを入力ファイルとすると、 以下がreversed.tsに出力されます。
;)(esolc.lr

;)`}rewsna{$ :kcabdeef elbaulav ruoy rof uoy knahT`(gol.elosnoc

;)' ?sj.edoN fo kniht uoy od tahW'(noitseuq.lr tiawa = rewsna tsnoc

;)} tuptuo ,tupni {(ecafretnIetaerc.enildaer = lr tsnoc

;'ssecorp:edon' morf } tuptuo sa tuodts ,tupni sa nidts { tropmi
;'sesimorp/enildaer:edon' morf enildaer sa * tropmi
outputFilePathが指定されていない場合は、コンソールに内容を出力します。
$ npm run dev -- ./basicCli.ts ./sampleCli.ts

> 002-create-cli@1.0.0 dev
> node --experimental-default-config-file ./basicCli.ts ./sampleCli.ts

Welcome to the Basic CLI!
[INFO] Reversed file content:

;)(esolc.lr

;)`}rewsna{$ :kcabdeef elbaulav ruoy rof uoy knahT`(gol.elosnoc

;)' ?sj.edoN fo kniht uoy od tahW'(noitseuq.lr tiawa = rewsna tsnoc

;)} tuptuo ,tupni {(ecafretnIetaerc.enildaer = lr tsnoc

;'ssecorp:edon' morf } tuptuo sa tuodts ,tupni sa nidts { tropmi
;'sesimorp/enildaer:edon' morf enildaer sa * tropmi
これらを try-catch で囲い、ファイルの読み書きで例外が発生した場合はエラーとして出力します。
完成したbasicCli.tsファイルは以下の通りです。
#!/usr/bin/env node

// Node.jsのモジュールをインポート
import fs from 'node:fs/promises';
import path from 'node:path';
// カスタムコンソールモジュールをインポート
import { debug, error, info } from './console.ts';

console.log('Welcome to the Basic CLI!');

const helpMessage =
  'Usage: basic-cli <file-path> [--out <output-path>] [--debug]';

// コマンドの引数を取得(0番目はnodeの実行パス、1番目はスクリプトのパスなので省く)
const args = process.argv.slice(2);
// 引数が不足している場合はヘルプメッセージを表示
if (args.length === 0) {
  info(helpMessage);
  process.exit(1);
}

let [inputFilePath, ...restArgs] = args;
// コマンドの1つ目の引数に、入力ファイルパスが指定されていない場合はエラーにする
if (!inputFilePath || inputFilePath.startsWith('--')) {
  error('Input file path is required');
  info(helpMessage);
  process.exit(1);
}

let outputFilePath = '';
for (let i = 0; i < restArgs.length; i++) {
  const arg = restArgs[i];

  if (arg === '--out') {
	// --outオプションが指定された場合、次の引数を出力ファイルパスとして取得する
	// 次の引数がない、または次の引数がオプション形式(--で始まる)ならエラーにする
	if (i + 1 >= args.length || restArgs[i + 1].startsWith('--')) {
  	error('--out requires a file path');
  	process.exit(1);
	}
	outputFilePath = restArgs[++i];
  } else if (arg === '--debug') {
	// --debugオプションが指定された場合、デバッグモードを有効にする
	process.env.DEBUG = 'true';
  } else {
	error(`Unknown argument: ${arg}`);
	process.exit(1);
  }
}

// 入力ファイルを読み込む
try {
  const absoluteInputPath = path.resolve(inputFilePath);
  const data = (await fs.readFile(absoluteInputPath)).toString();

  debug(`Input file path: ${absoluteInputPath}`);
  debug(`Input file content:\n${data}`);

  const reversedData = data.split("").reverse().join("");
  if (outputFilePath) {
	// 出力ファイルパスが指定されている場合、内容を逆順にしてファイルに書き込む
	const absoluteOutputPath = path.resolve(outputFilePath);
	await fs.writeFile(absoluteOutputPath, reversedData);
	debug(`Output written to: ${absoluteOutputPath}`);
  } else {
	// 出力ファイルパスが指定されていない場合、コンソールに出力する
	info(`Reversed file content:\n${reversedData}`);
  }
} catch (err) {
  if (err instanceof Error) {
	error(err.message);
  } else {
	error('An unknown error occurred');
  }
  process.exit(1);
}
対話型で入力を受け取るCLIを実装する
前項の全て引数で指定していたCLIを、readline APIで対話型に書き換えてみましょう。interactiveCli.tsファイルを作成し、必要なモジュールをimportします。また、readlineインターフェースの作成と、これをラップした質問用のquestion関数を追加します。
#!/usr/bin/env node

import fs from 'node:fs/promises';
import path from 'node:path';
import readline from 'node:readline';
import { debug, error, info } from './console.ts';

console.log('Welcome to the Interactive CLI!');

// readline インターフェースを作成する
const rl = readline.createInterface({
  input: process.stdin,
  output: process.stdout,
});

// 質問を非同期で行う関数を定義する
function question(query: string): Promise {
  return new Promise(resolve => rl.question(query, resolve));
}
readlineインターフェースは標準入出力に接続されています。また、question関数はrl.questionをPromiseでラップしておりawait question('質問内容')のように扱えます。
interactiveCli.tsファイルの続きに、入力ファイルのパス・出力ファイルへのパス・デバッグモードの有無を質問する処理を追加します。
// ~~~ function question(query: string): Promise{ return new Promise(resolve => rl.question(query, resolve)); } // --- 以下を追加 --- try { // それぞれ、ユーザーからの入力を受け付ける const inputFilePath = await question('Enter the input file path: '); if (!inputFilePath) { error('Input file path is required'); rl.close(); process.exit(1); } const outputFilePath = await question( 'Enter output file path (leave blank to print to console): ' ); const debugMode = await question('Enable debug mode? (y/N): '); if (debugMode.trim().toLowerCase() === 'y') { process.env.DEBUG = 'true'; } // basicCli.ts と同様に入力ファイルを処理する(後ほど追加します) } catch (err) { if (err instanceof Error) { error(err.message); } else { error('An unknown error occurred'); } rl.close(); process.exit(1); }
ターミナルでCLIを起動すると以下のように質問が表示され、それぞれに回答できます。入力ファイルのパスと出力ファイルのパスは、テキストとして自由に入力できます。また、デバッグモードはyを入力すると有効になります。
$ npm run dev -- ./interactiveCli.ts

> 002-create-cli@1.0.0 dev
> node --experimental-default-config-file ./interactiveCli.ts

Welcome to the Interactive CLI!
Enter the input file path: ./sampleCli.ts
Enter output file path (leave blank to print to console): ./reversed.ts
Enable debug mode? (y/N):y
なお、まだreadlineをクローズする処理を入れていないため、デバッグモードの入力まで行った後は[Ctrl]キー+[C]キーでプロセスを閉じてください。
interactiveCli.tsファイルの続きに、basicCli.tsと同じような入力に応じた出力処理を先のソースコードの// basicCli.ts と同様に入力ファイルを処理する(後ほど追加します)の下に追加します。
  if (debugMode.trim().toLowerCase() === 'y') {
	process.env.DEBUG = 'true';
  }

	// basicCli.ts と同様に入力ファイルを処理する(後ほど追加します)
	// --- 以下を追加 ---
  const absoluteInputPath = path.resolve(inputFilePath);
  const data = (await fs.readFile(absoluteInputPath)).toString();

  debug(`Input file path: ${absoluteInputPath}`);
  debug(`Input file content:\n${data}`);

  const reversedData = data.split('').reverse().join('');
  if (outputFilePath) {
	const absoluteOutputPath = path.resolve(outputFilePath);
	await fs.writeFile(absoluteOutputPath, reversedData);
	debug(`Output written to: ${absoluteOutputPath}`);
  } else {
	info(`Reversed file content:\n${reversedData}`);
  }

  // readline インターフェースを閉じる
  rl.close();
} catch (err) {
  // ~~~
readlineは、全ての処理が終わった後でrl.closeすると正常に終了できます。ターミナルからCLIを起動し、質問に回答すると結果に応じた内容が出力されます。
完成したinteractiveCli.tsファイルは以下の通りです。
#!/usr/bin/env node

import fs from 'node:fs/promises';
import path from 'node:path';
import readline from 'node:readline';
import { debug, error, info } from './console.ts';

console.log('Welcome to the Interactive CLI!');

// readline インターフェースを作成する
const rl = readline.createInterface({
  input: process.stdin,
  output: process.stdout,
});

// 質問を非同期で行う関数を定義する
function question(query: string): Promise<string> {
  return new Promise(resolve => rl.question(query, resolve));
}

try {
  // それぞれ、ユーザーからの入力を受け付ける
  const inputFilePath = await question('Enter the input file path: ');
  if (!inputFilePath) {
	error('Input file path is required');
	rl.close();
	process.exit(1);
  }
  const outputFilePath = await question(
	'Enter output file path (leave blank to print to console): '
  );
  const debugMode = await question('Enable debug mode? (y/N): ');
  if (debugMode.trim().toLowerCase() === 'y') {
	process.env.DEBUG = 'true';
  }

  // basicCli.tsと同様に処理する
  const absoluteInputPath = path.resolve(inputFilePath);
  const data = (await fs.readFile(absoluteInputPath)).toString();

  debug(`Input file path: ${absoluteInputPath}`);
  debug(`Input file content:\n${data}`);

  const reversedData = data.split('').reverse().join('');
  if (outputFilePath) {
	const absoluteOutputPath = path.resolve(outputFilePath);
	await fs.writeFile(absoluteOutputPath, reversedData);
	debug(`Output written to: ${absoluteOutputPath}`);
  } else {
	info(`Reversed file content:\n${reversedData}`);
  }

  // readline インターフェースを閉じる
  rl.close();
} catch (err) {
  if (err instanceof Error) {
	error(err.message);
  } else {
	error('An unknown error occurred');
  }
  rl.close();
  process.exit(1);
}
余談:高速化されたTypeScript Compilerのtsgoを試す
「セットアップ」の項でtscによる型チェックやビルドを行いました。このtscに代わる新たなCLIが「tsgo」という名前でMicrosoftにより開発されています。tsgoはtscよりも実行速度が10倍速いことが謳われています。今回用いたプロジェクトで型チェックし、速度を比較してみましょう。
tsgoのセットアップ
以下のコマンドでインストールします。
npm install -D @typescript/native-preview
npx tsc --noEmit --extendedDiagnosticsとnpx tsgo --noEmit --extendedDiagnosticsの、結果の時間に関する箇所をそれぞれ比較します。
$ npx tsc --noEmit --extendedDiagnostics
Files:                     	186
~~~
I/O Read time:           	0.01s
Parse time:              	0.09s
ResolveModule time:      	0.01s
ResolveTypeReference time:  0.00s
ResolveLibrary time:     	0.00s
Program time:            	0.13s
Bind time:               	0.05s
Check time:              	0.45s
printTime time:          	0.00s
Emit time:               	0.00s
Total time:              	0.62s
$ npx tsgo --noEmit --extendedDiagnostics
Files:          186
~~~
Config time: 	0.001s
Parse time:  	0.025s
Bind time:   	0.006s
Check time:  	0.136s
Emit time:   	0.000s
Total time:  	0.169s
コードの規模的に実行速度の差が現れにくい状況ではあったものの、3倍ほど速度が向上しています。TypeScript 7.0で正式にリリースされる予定で、今後の動向に注目です。
CLIを公開する
これまでに実装したCLIをライブラリとして公開してみましょう。package.jsonのbinフィールドにinteractive-cliを追加します。
{
  "name": "002-create-cli",
  // ~~~
  "bin": {
	"basic-cli": "./dist/basicCli.js",
	"interactive-cli": "./dist/interactiveCli.js"
  },
  // ~~~
}
また、package.jsonにfilesフィールドを追加し、公開したいディレクトリを追加します。今回は distを追加します。
{
  "name": "002-create-cli",
  // ~~~
  "files": [
	"dist"
  ],
  // ~~~
}
npmのアカウントをhttps://www.npmjs.com/signupから作成し、ターミナルでnpm CLIを用いて以下のコマンドでログインします。
$ npm login
npm notice Log in on https://registry.npmjs.org/
Login at:
https://www.npmjs.com/login?next=/login/cli/~~~~~~~
Press ENTER to open in the browser...

Logged in on https://registry.npmjs.org/.
また、package.jsonのnameフィールドを@<npmのアカウントid>/002-create-cliに書き換えます。私のアカウントIDはdid0esなので、以下のように書き換えます。
{
  "name": "@did0es/002-create-cli"
  // ~~~
}
これでアカウントIDを名前空間のように扱え、他の方と重複した名前のパッケージでも公開できます。
npm run buildでビルドし、npm publishにdry-runオプションを付けて実行した後、結果に問題がなければ公開します。
$ npm publish --access public --dry-run # dry-runなので実際にpublishはされない

$ npm publish --access public # publish
それでは、公開したパッケージをnpm CLIでインストールして使ってみましょう。
$ npm install --global @did0es/002-create-cli@latest

$ asdf reshim nodejs # nodejsのバージョン管理にasdfを使っている場合、reshimを実行する
basic-cliとinteractive-cliを実行できれば完了です。お疲れさまでした!
$ basic-cli
Welcome to the Basic CLI!
[INFO] Usage: basic-cli <file-path> [--out <output-path>] [--debug]

$ interactive-cli
Welcome to the Interactive CLI!
Enter the input file path:
以上のコードはGitHubのリポジトリに掲載しています。併せてご覧ください。
次回は、入力されたソースコードのASTを解析し、configに基づいて処理するCLIの実装を行います。
【参考文献】

連載バックナンバー


Think ITメルマガ会員登録受付中
他にもこの記事が読まれています


全文検索エンジンによるおすすめ記事
- ASTの基礎知識とTypeScriptの環境構築から始めるCLIツール開発
- expressで開発したWebアプリをeXcaleで動かす
- Fabric SDK(Software Development Kit)を用いてNode.jsからchaincodeを呼び出す
- ES2015のモジュール管理
- HTTPリクエストを簡単に!npm requestを使う方法【初心者向け】
- 生まれ変わったJavaScript/ECMAScript
- ECMAScript
- 「Ace」を使って「TAURI」で「テキストエディタ」アプリを作ろう
- ES2015が備えるモダンな非同期処理
- 「TAURI」でExcelのデータを読み書きしてWebページに表示してみよう