ASTの解析とCLIの実装によるTypeScript製Lintツール開発

はじめに
こんにちは。サイバーエージェントのソフトウェアエンジニアの平井柊太(@did0es)です。
前回は、TypeScriptによるCLIの開発と、開発したCLIをnpmへパッケージとして公開しました。
今回は、TypeScriptの抽象構文木(以下、AST)の解析と、この解析処理を用いたLint向けのCLIを作ります。
TypeScriptのASTを解析してみる
プロジェクトをセットアップする
まず、プロジェクトをセットアップします。前回と同様の手順なので、ご存知の方は「ASTを解析するCLIを実装する」の項まで読み飛ばしていただいて構いません。
Node.jsは、これまでと同様にv23.10.0を使います。build-your-own-ast-tools-by-typescriptディレクトリの中に、以下で新たな作業用ディレクトリ(003-analyze-astディレクトリ)を作成します。
mkdir -p build-your-own-ast-tools-by-typescript/003-analyze-ast
cd build-your-own-ast-tools-by-typescript/003-analyze-ast
ターミナルでnpm CLIを用いて、プロジェクトを初期化します。
npm init -y
ES Modulesを有効化するために、生成されたpackage.jsonを開き、typeフィールドを追加して"module"を指定します。
{
  "name": "003-analyze-ast",
  // ~~~
  "type": "module"
}
開発に用いるパッケージをインストールします。以下が必要なパッケージとバージョンです。
typescript:v5.8.3@types/node:v22.15.30
ターミナルでnpm CLIを用いて、以下のコマンドでインストールします。
npm install -D typescript@5.8.3 @types/node@22.15.30
ターミナルでtypescriptに付属しているtscを用いて、TypeScriptのセットアップを行います。
npx tsc --init
生成されたtsconfig.jsonファイルを以下のように書き換えます。
{
  "compilerOptions": {
    "target": "esnext",                         // 出力するJavaScriptのバージョンを最新(ESNext)に設定
    "module": "ESNext",                         // モジュール形式をES Modulesに設定。import/exportを保持して出力
    "moduleResolution": "bundler",              // モジュール解決方法をバンドラ(Vite, esbuildなど)向けに最適化。拡張子付きimportも許可
    "outDir": "./dist",                         // トランスパイルされたJavaScriptファイルの出力先フォルダをdistに
    "rootDir": "./",                            // ソースファイルのルートディレクトリを指定
    "forceConsistentCasingInFileNames": true,   // import時のファイル名の大文字・小文字の不一致をエラーにする(OS差によるバグ防止)
    "strict": true,                             // 厳格な型チェックオプションを有効にする
    "allowImportingTsExtensions": true,         // 拡張子付きのTypeScriptファイルのimportを許可
    "rewriteRelativeImportExtensions": true,    // 相対パスのimportで拡張子を自動的に追加
  },
  "include": ["**/*.ts"],                       // サブフォルダを含むすべての.tsファイルを対象にする
  "exclude": ["node_modules", "dist"]           // node_modulesと出力先のdistフォルダは対象外にする
}
作業用ディレクトリの中にnode.config.jsonファイルを作成し、以下を記述します。
{
  "$schema": "https://nodejs.org/dist/v23.10.0/docs/node-config-schema.json",
  "nodeOptions": {
    "disable-warning": ["ExperimentalWarning"],
    "experimental-transform-types": true,
    "experimental-detect-module": true
  }
}
package.jsonを開き、scriptsフィールドに以下を追記します。
{
  "name": "003-analyze-ast",
  // ~~~
  "scripts": {
    "dev": "node --experimental-default-config-file",
    "build": "tsc",
    "typecheck": "tsc --noEmit"
  },
  // ~~~
}
作業用ディレクトリの中にconsole.tsファイルを作成し、以下を追記します。
export function error(message: string): void {
  console.error(`[ERROR] ${message}`);
}

export function info(message: string): void {
  console.log(`[INFO] ${message}`);
}

export function warn(message: string): void {
  console.warn(`[WARN] ${message}`);
}

export function success(message: string): void {
  console.log(`[SUCCESS] ${message}`);
}

export function debug(message: string): void {
  if (process.env.DEBUG === 'true') {
    console.log(`[DEBUG] ${message}`);
  }
}
以上で、プロジェクトのセットアップは完了です。
ASTを解析するCLIを実装する
それでは、TypeScriptで書かれたソースコードのASTを解析してみましょう。作業用ディレクトリの中にvalidInput.tsファイルを作成します。このファイルはCLIの入力として使います。
003-analyze-ast
└── __mocks__
    └── validInput.ts
__mocks__配下のファイルはビルドの対象に含めないように、tsconfig.jsonを開いてexcludeフィールドに__mocks__ディレクトリを追記します。
{
  // ~~~
  "exclude": ["node_modules", "dist", "__mocks__"]  // node_modules、出力先のdistフォルダ、__mocks__フォルダは対象外にする
}
追加したvalidInput.tsファイルを開き、以下を記述します。このコードではAnimalクラスを継承したDogクラスを定義し、インスタンスを生成しています。
class Animal {
  species: string;

  constructor(species: string) {
    this.species = species;
  }

  showSpecies() {
    console.log(`この動物は ${this.species} です。`);
  }

  eat(food: string) {
    console.log(`${this.species} は ${food} を食べています。`);
  }

  sleep(hours: number) {
    console.log(`${this.species} は ${hours} 時間眠ります。`);
  }

  move(distance: number) {
    console.log(`${this.species} は ${distance} メートル移動しました。`);
  }
}

class Dog extends Animal {
  name: string;
  age: number;

  constructor(
    name: string,
    age: number
  ) {
    super('Dog');

    this.name = name;
    this.age = age;
  }

  showInfo() {
    console.log(`名前: ${this.name}, 年齢: ${this.age}`);
  }

  bark() {
    console.log(`${this.name} が吠えました: ワンワン!`);
  }
}

const pochi = new Dog('ポチ', 3);
pochi.showSpecies();                // この動物は Dog です。
pochi.eat('ドッグフード');          // Dog は ドッグフード を食べています。
pochi.sleep(8);                     // Dog は 8 時間眠ります。
pochi.move(10);                     // Dog は 10 メートル移動しました。
pochi.showInfo();                   // 名前: ポチ, 年齢: 3
pochi.bark();                       // ポチ が吠えました: ワンワン!
次に、作業用ディレクトリの中にanalyzeAstCli.tsファイルを作成します。このファイルでは__mocks__内のファイルを入力として、TypeScriptのソースコードのASTの情報を出力するCLIを実装します。
作成したanalyzeAstCli.tsファイルを開き、以下を記述します。前回実装したBasic CLIをベースに、--outオプションを受け取らないCLIになっています。
#!/usr/bin/env node

// Node.jsのモジュールをインポート
import fs from 'node:fs/promises';
import path from 'node:path';
// カスタムコンソールモジュールをインポート
import { debug, error, info } from './console.ts';

console.log('Welcome to the Analyze AST CLI!');

const helpMessage =
  'Usage: analyze-ast-cli <file-path> [--debug]';

// コマンドの引数を取得(0番目はnodeの実行パス、1番目はスクリプトのパスなので省く)
const args = process.argv.slice(2);
// 引数が不足している場合はヘルプメッセージを表示
if (args.length === 0) {
  info(helpMessage);
  process.exit(1);
}

let [inputFilePath, ...restArgs] = args;
// コマンドの1つ目の引数に、入力ファイルパスが指定されていない場合はエラーにする
if (!inputFilePath || inputFilePath.startsWith('--')) {
  error('Input file path is required');
  info(helpMessage);
  process.exit(1);
}

for (let i = 0; i < restArgs.length; i++) {
  const arg = restArgs[i];

  if (arg === '--debug') {
    // --debugオプションが指定された場合、デバッグモードを有効にする
    process.env.DEBUG = 'true';
  } else {
    error(`Unknown argument: ${arg}`);
    process.exit(1);
  }
}

// 入力ファイルを読み込む
try {
  const absoluteInputPath = path.resolve(inputFilePath);
  const data = (await fs.readFile(absoluteInputPath)).toString();

  debug(`Input file path: ${absoluteInputPath}`);
  debug(`Input file content:\n${data}`);

  const reversedData = data.split("").reverse().join("");
  // コンソールに出力する
  info(`Reversed file content:\n${reversedData}`);
} catch (err) {
  if (err instanceof Error) {
    error(err.message);
  } else {
    error('An unknown error occurred');
  }
  process.exit(1);
}
このCLIを動かしてみましょう。package.jsonファイルを開いてbinフィールドを追加します。このフィールドにanalyze-ast-cliを追加します。
{
  "name": "003-analyze-ast",
  // ~~~
  "bin": {
    "analyze-ast-cli": "./dist/analyzeAstCli.js"
  },
  // ~~~
}
ターミナルから以下のコマンドを実行し、結果が出力されればCLIとして正常に動作しています。
$ npm run build

> 003-analyze-ast@1.0.0 build
> tsc

$ npx analyze-ast-cli
Welcome to the Analyze AST CLI!
[INFO] Usage: analyze-ast-cli <file-path> [--debug]
開発中はnpm run dev -- ./analyzeAstCli.tsでデバッグします。こちらもターミナルから実行してみましょう。npx analyze-ast-cliと同じ出力であれば、正常に動作しています。
$ npm run dev -- ./analyzeAstCli.ts
Welcome to the Analyze AST CLI!
[INFO] Usage: analyze-ast-cli <file-path> [--debug]
入力ファイルのASTを解析する準備をします。作業用ディレクトリにcreateAst.tsファイルを作成し、以下を記述します。
import { readFile } from 'fs/promises';

import ts from 'typescript';

export type AstNode = {
  kind: string;
  text: string;
  children: AstNode[];
};

function toAstNode(node: ts.Node) {
  const result: AstNode = {
    kind: ts.SyntaxKind[node.kind],
    text: node.getText(),
    children: [],
  };
  ts.forEachChild(node, (child) => {
    result.children.push(toAstNode(child));
  });
  return result;
}

export async function createAst(fileName: string) {
  const sourceCode = await readFile(fileName, 'utf8');
  const sourceFile = ts.createSourceFile(
    fileName,
    sourceCode,
    ts.ScriptTarget.Latest,
    true
  );

  return toAstNode(sourceFile);
}
TypeScriptのCompiler APIを利用して、ソースコードをASTに変換しています。createAst.ts関数が出力するASTは下図の構造になっています。
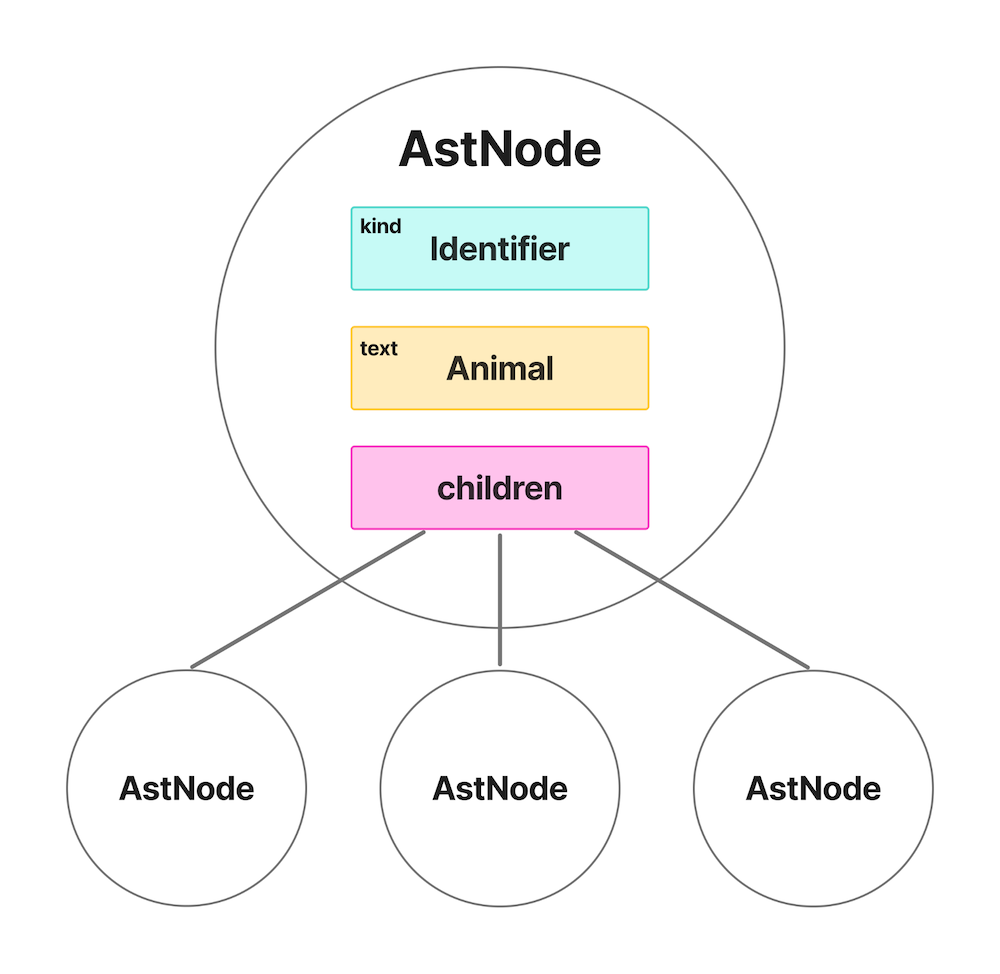
生成されたASTは、画像における丸型の図形のようなノードの集合です。ノードには以下のプロパティが含まれます。
kind:ノードの種別を表すプロパティtext:ノードのテキストを表すプロパティchildren:子ノードを格納するプロパティ
親ノード1つに対して複数の子ノードを持つ、1対多の関係になっています。末端のノードではchildrenは空になります。
analyzeAstCli.tsファイルを開き、先に作成したcreateAst関数を呼び出す処理を追加しましょう。行末に// 追加: 〇〇でコメントした箇所が新たに追加された処理です。
#!/usr/bin/env node

// Node.jsのモジュールをインポート
import fs from 'node:fs/promises';
import path from 'node:path';
// カスタムコンソールモジュールをインポート
import { debug, error, info } from './console.ts';
import { createAst } from './createAst.ts'; // 追加: createAst関数をインポート

console.log('Welcome to the Analyze AST CLI!');

const helpMessage =
  'Usage: analyze-ast-cli <file-path> [--debug]';

// コマンドの引数を取得(0番目はnodeの実行パス、1番目はスクリプトのパスなので省く)
const args = process.argv.slice(2);
// 引数が不足している場合はヘルプメッセージを表示
if (args.length === 0) {
  info(helpMessage);
  process.exit(1);
}

let [inputFilePath, ...restArgs] = args;
// コマンドの1つ目の引数に、入力ファイルパスが指定されていない場合はエラーにする
if (!inputFilePath || inputFilePath.startsWith('--')) {
  error('Input file path is required');
  info(helpMessage);
  process.exit(1);
}

for (let i = 0; i < restArgs.length; i++) {
  const arg = restArgs[i];

  if (arg === '--debug') {
    // --debugオプションが指定された場合、デバッグモードを有効にする
    process.env.DEBUG = 'true';
  } else {
    error(`Unknown argument: ${arg}`);
    process.exit(1);
  }
}

// 入力ファイルを読み込む
try {
  const absoluteInputPath = path.resolve(inputFilePath);
  const data = (await fs.readFile(absoluteInputPath)).toString();

  debug(`Input file path: ${absoluteInputPath}`);
  debug(`Input file content:\n${data}`);

  const ast = await createAst(absoluteInputPath); // 追加: `const reversedData = data.split("").reverse().join("");` を置き換え
  // コンソールに出力する
  info(`Ast kind: ${ast.kind}`); // 追加: `info(`Reversed file content:\n${reversedData}`);` を置き換え
} catch (err) {
  if (err instanceof Error) {
    error(err.message);
  } else {
    error('An unknown error occurred');
  }
  process.exit(1);
}
ターミナルからnpm run dev -- ./analyzeAstCli.ts ./__mocks__/validInput.tsを実行すると、以下の出力を得られます。
$ npm run dev -- ./analyzeAstCli.ts ./__mocks__/validInput.ts

> 003-analyze-ast@1.0.0 dev
> node --experimental-default-config-file ./analyzeAstCli.ts ./__mocks__/validInput.ts

Welcome to the Analyze AST CLI!
[INFO] Ast kind: SourceFile
TypeScriptのASTでは、ソースコード全体をSourceFileという種別で扱います。
それでは、ASTのすべてのノードを探索し、ソースコードがどういった種別のASTで構成されているのか解析しましょう。traverseAst.tsファイルを作成し、以下を記述します。
import type { AstNode } from './createAst.ts';
import { debug } from './console.ts';

export function traverseAst(astNode: AstNode, depth = 0) {
  const indent = '  '.repeat(depth);
  debug(
    `${indent}Kind: ${astNode.kind}, Text: ${astNode.text.replaceAll('\n', ' ').slice(0, 20)}`
  );

  for (const child of astNode.children) {
    traverseAst(child, depth + 1);
  }
}
traverseAst関数でASTを再帰的に走査し、kindとtextを出力します。textは、ログの見やすさのために改行を除き先頭から20文字だけ表示しています。
analyzeAstCli.tsファイルを開き、先に追加したtraverseAst関数を呼び出す処理を追加しましょう。行末に// 追加: 〇〇でコメントした箇所が新たに追加された処理です。
#!/usr/bin/env node

// Node.jsのモジュールをインポート
import fs from 'node:fs/promises';
import path from 'node:path';
// カスタムコンソールモジュールをインポート
import { debug, error, info } from './console.ts';
import { createAst } from './createAst.ts';
import { traverseAst } from './traverseAst.ts'; // 追加: traverseAst関数をインポート

console.log('Welcome to the Analyze AST CLI!');

const helpMessage =
  'Usage: analyze-ast-cli <file-path> [--debug]';

// コマンドの引数を取得(0番目はnodeの実行パス、1番目はスクリプトのパスなので省く)
const args = process.argv.slice(2);
// 引数が不足している場合はヘルプメッセージを表示
if (args.length === 0) {
  info(helpMessage);
  process.exit(1);
}

let [inputFilePath, ...restArgs] = args;
// コマンドの1つ目の引数に、入力ファイルパスが指定されていない場合はエラーにする
if (!inputFilePath || inputFilePath.startsWith('--')) {
  error('Input file path is required');
  info(helpMessage);
  process.exit(1);
}

for (let i = 0; i < restArgs.length; i++) {
  const arg = restArgs[i];

  if (arg === '--debug') {
    // --debugオプションが指定された場合、デバッグモードを有効にする
    process.env.DEBUG = 'true';
  } else {
    error(`Unknown argument: ${arg}`);
    process.exit(1);
  }
}

// 入力ファイルを読み込む
try {
  const absoluteInputPath = path.resolve(inputFilePath);
  const data = (await fs.readFile(absoluteInputPath)).toString();

  debug(`Input file path: ${absoluteInputPath}`);
  debug(`Input file content:\n${data}`);

  const ast = await createAst(absoluteInputPath);

  // AST を走査して情報を出力する
  traverseAst(ast); // 追加: `info(`Ast kind: ${ast.kind}`);` を置き換える
} catch (err) {
  if (err instanceof Error) {
    error(err.message);
  } else {
    error('An unknown error occurred');
  }
  process.exit(1);
}
ターミナルからnpm run dev -- ./analyzeAstCli.ts ./__mocks__/validInput.ts --debugを実行すると、以下のような出力を得られます。
$ npm run dev -- ./analyzeAstCli.ts ./__mocks__/validInput.ts --debug

> 003-analyze-ast@1.0.0 dev
> node --experimental-default-config-file ./analyzeAstCli.ts ./__mocks__/validInput.ts

Welcome to the Analyze AST CLI!
# ~~~
# その他のdebugログ
# ~~~
[DEBUG] Kind: SourceFile, Text: class Animal {   spe
[DEBUG]   Kind: ClassDeclaration, Text: class Animal {   spe
[DEBUG]     Kind: Identifier, Text: Animal
[DEBUG]     Kind: PropertyDeclaration, Text: species: string;
[DEBUG]       Kind: Identifier, Text: species
[DEBUG]       Kind: StringKeyword, Text: string
# 続く...
左にASTのノードのkindが、右にASTのノードのtextがコンマ区切りで表示されます。インデントが深くなるほど、ASTの末端のノードに近づいていきます。
以上で、入力ファイルのソースコードをASTに変換し、変換したものを走査してログに出力する解析CLIが実装できました。完成したファイルは以下の通りです。
createAst.ts
import { readFile } from 'fs/promises';

import ts from 'typescript';

export type AstNode = {
  kind: string;
  text: string;
  children: AstNode[];
};

function toAstNode(node: ts.Node) {
  const result: AstNode = {
    kind: ts.SyntaxKind[node.kind],
    text: node.getText(),
    children: [],
  };
  ts.forEachChild(node, (child) => {
    result.children.push(toAstNode(child));
  });
  return result;
}

export async function createAst(fileName: string) {
  const sourceCode = await readFile(fileName, 'utf8');
  const sourceFile = ts.createSourceFile(
    fileName,
    sourceCode,
    ts.ScriptTarget.Latest,
    true
  );

  return toAstNode(sourceFile);
}
traverseAst.ts
import type { AstNode } from './createAst.ts';
import { debug } from './console.ts';

export function traverseAst(astNode: AstNode, depth = 0) {
  const indent = '  '.repeat(depth);
  debug(
    `${indent}Kind: ${astNode.kind}, Text: ${astNode.text.replaceAll('\n', ' ').slice(0, 20)}`
  );

  for (const child of astNode.children) {
    traverseAst(child, depth + 1);
  }
}
analyzeAstCli.ts
#!/usr/bin/env node

// Node.jsのモジュールをインポート
import fs from 'node:fs/promises';
import path from 'node:path';
// カスタムコンソールモジュールをインポート
import { debug, error, info } from './console.ts';
import { createAst } from './createAst.ts';
import { traverseAst } from './traverseAst.ts';

console.log('Welcome to the Analyze AST CLI!');

const helpMessage =
  'Usage: analyze-ast-cli <file-path> [--debug]';

// コマンドの引数を取得(0番目はnodeの実行パス、1番目はスクリプトのパスなので省く)
const args = process.argv.slice(2);
// 引数が不足している場合はヘルプメッセージを表示
if (args.length === 0) {
  info(helpMessage);
  process.exit(1);
}

let [inputFilePath, ...restArgs] = args;
// コマンドの1つ目の引数に、入力ファイルパスが指定されていない場合はエラーにする
if (!inputFilePath || inputFilePath.startsWith('--')) {
  error('Input file path is required');
  info(helpMessage);
  process.exit(1);
}

for (let i = 0; i < restArgs.length; i++) {
  const arg = restArgs[i];

  if (arg === '--debug') {
    // --debugオプションが指定された場合、デバッグモードを有効にする
    process.env.DEBUG = 'true';
  } else {
    error(`Unknown argument: ${arg}`);
    process.exit(1);
  }
}

// 入力ファイルを読み込む
try {
  const absoluteInputPath = path.resolve(inputFilePath);
  const data = (await fs.readFile(absoluteInputPath)).toString();

  debug(`Input file path: ${absoluteInputPath}`);
  debug(`Input file content:\n${data}`);

  const ast = await createAst(absoluteInputPath);

  // AST を走査して情報を出力する
  traverseAst(ast);
} catch (err) {
  if (err instanceof Error) {
    error(err.message);
  } else {
    error('An unknown error occurred');
  }
  process.exit(1);
}
Linterを作る
「ASTを解析するCLIを実装する」の項で実装したCLIを改変し、コンフィグファイルに応じてソースコードをLintするCLI(Linter)を実装します。Linterについては第1回で紹介しているので、適宜参照してください。
ソースコードをLintするCLIを実装する
ソースコードが定めたルールに違反している場合、エラーを出力するCLIを実装します。作業用ディレクトリ(003-analyze-astディレクトリ)にconfig.jsonを作成し、以下を記述します。
{
  "call-super-in-constructor": "error",
  "use-this-in-method": "error"
}
それぞれ、以下のようなルールです。
"call-super-in-constructor": "error":継承した先のクラスのconstructorでsuper()を呼び出していない場合エラーにする(ESLintのconstructor-superのようなルール)"use-this-in-method": "error":クラスのメソッド内でthisを使っていない場合エラーにする(ESLintのclass-methods-use-thisのようなルール)
作業用ディレクトリ内のanalyzeAstCli.tsファイルをlintCli.tsファイルにコピーします。コピーしたlintCli.tsファイルを開き、以下の// 追加: ①開始と// 追加: ①終了、// 追加: ②開始と// 追加: ②終了、// 追加: ③開始と// 追加: ③終了で囲まれた処理をそれぞれ記述します。
#!/usr/bin/env node

// Node.jsのモジュールをインポート
import fs from 'node:fs/promises';
import path from 'node:path';
// カスタムコンソールモジュールをインポート
import { debug, error, info } from './console.ts';
import { createAst } from './createAst.ts';
import { traverseAst } from './traverseAst.ts';

// 追加: ①開始
// configの型を定義
export type Config = {
  'call-super-in-constructor': 'error' | 'warn' | 'off';
  'use-this-in-method': 'error' | 'warn' | 'off';
};
// 追加: ①終了

console.log('Welcome to the Lint CLI!');

const helpMessage = 'Usage: analyze-ast-cli <file-path> [--debug]';

// コマンドの引数を取得(0番目はnodeの実行パス、1番目はスクリプトのパスなので省く)
const args = process.argv.slice(2);
// 引数が不足している場合はヘルプメッセージを表示
if (args.length === 0) {
  info(helpMessage);
  process.exit(1);
}

let [inputFilePath, ...restArgs] = args;
// コマンドの1つ目の引数に、入力ファイルパスが指定されていない場合はエラーにする
if (!inputFilePath || inputFilePath.startsWith('--')) {
  error('Input file path is required');
  info(helpMessage);
  process.exit(1);
}

// 追加: ②開始
// コマンドが実行されたディレクトリにconfigファイルがない場合はエラーにする
const configFilePath = path.resolve('config.json');
const isConfigFileExists = await fs.access(configFilePath).then(() => true).catch(() => false);
if (!isConfigFileExists) {
  error('Config file not found: config.json');
  process.exit(1);
}
// 追加: ②終了

for (let i = 0; i < restArgs.length; i++) {
  const arg = restArgs[i];

  if (arg === '--debug') {
    // --debugオプションが指定された場合、デバッグモードを有効にする
    process.env.DEBUG = 'true';
  } else {
    error(`Unknown argument: ${arg}`);
    process.exit(1);
  }
}

// 入力ファイルを読み込む
try {
  const absoluteInputPath = path.resolve(inputFilePath);
  const data = (await fs.readFile(absoluteInputPath)).toString();

  debug(`Input file path: ${absoluteInputPath}`);
  debug(`Input file content:\n${data}`);

  // 追加: ③開始
  // configファイルを読み込む
  const config: Config = JSON.parse(
    (await fs.readFile(configFilePath)).toString()
  );
  debug(`Config file content:\n${JSON.stringify(config, null, 2)}`);
  // 追加: ③終了

  const ast = await createAst(absoluteInputPath);

  // AST を走査して情報を出力する
  traverseAst(ast);
} catch (err) {
  if (err instanceof Error) {
    error(err.message);
  } else {
    error('An unknown error occurred');
  }
  process.exit(1);
}
// 追加: ①では、コンフィグ向けの型を定義しています。// 追加: ②ではconfig.jsonファイルを確認し、存在しない場合はエラーを出力して終了します。// 追加: ③ではconfig.jsonファイルの内容を読み込んでいます。
次に、読み込んだコンフィグと、ソースコードのASTを受け取って検査する処理を実装しましょう。checkAst.tsファイルを作成し、以下を記述します。
import type { AstNode } from './createAst.ts';
import type { Config } from './lintCli.ts';
import { debug, error, warn } from './console.ts';

export function checkAst(astNode: AstNode, depth = 0, config: Config) {
  const indent = '  '.repeat(depth);
  debug(
    `${indent}Kind: ${astNode.kind}, Text: ${astNode.text.replaceAll('\n', ' ').slice(0, 20)}`
  );

  // ルール違反があるかどうかのフラグ
  let hasViolation = false;
  // configのcall-super-in-constructorが有効な場合、ルールを適用してASTを検査する
  if (
    config['call-super-in-constructor'] !== 'off' &&
    astNode.kind === 'ClassDeclaration' &&
    // extendsキーワードが存在する場合、親クラスがあると判断する
    astNode.children.some((child) => child.kind === 'HeritageClause')
  ) {
    // ClassDeclarationのASTノードの中からConstructorのASTノードを探す
    const constructor = astNode.children.find(
      (child) => child.kind === 'Constructor'
    );
    if (!constructor) return;

    // ConstructorのASTノードの中からBlockのASTノードを探す
    const block = constructor.children.find((child) => child.kind === 'Block');
    if (!block) return;

    // BlockのASTノードの中からExpressionStatementのASTノードを探す
    const expressionStatement = block.children.find(
      (child) => child.kind === 'ExpressionStatement'
    );
    if (!expressionStatement) return;

    // ExpressionStatementのASTノードの中からCallExpressionのASTノードを探す
    const callExpression = expressionStatement.children.find(
      (child) => child.kind === 'CallExpression'
    );
    // CallExpressionのASTノードが見つからない場合は、super()が呼び出されていないと判断する
    // また、CallExpressionのtextに'super'が含まれていない場合も同様にする
    if (!callExpression || !callExpression.text.includes('super')) {
      const message = 'Constructor should call super() but does not';
      if (config['call-super-in-constructor'] === 'error') {
        error(message);
      }
      if (config['call-super-in-constructor'] === 'warn') {
        warn(message);
      }
      hasViolation = true;
    }
  }

  for (const child of astNode.children) {
    if (checkAst(child, depth + 1, config)) {
      hasViolation = true;
    }
  }

  return hasViolation;
}
traverseAst関数の処理を改変して利用しています。ソースコード内のclassが何らかのclassを継承している場合、constructor内でsuperを呼び出しているかを検査しています。また、ルール違反があるかどうかをhasViolationというフラグで管理し、checkAst関数の戻り値としています。
lintCli.tsファイルを開き、traverseAst関数の呼び出し箇所をcheckAst関数に置き換えましょう。併せて、行末に// 追加でマークされた処理と、// 追加: 開始と// 追加: 終了で囲われた処理を追加します。
#!/usr/bin/env node

// Node.jsのモジュールをインポート
import fs from 'node:fs/promises';
import path from 'node:path';
// カスタムコンソールモジュールをインポート
import { debug, error, info } from './console.ts';
import { createAst } from './createAst.ts';
import { checkAst } from './checkAst.ts'; // 追加

// configの型を定義
export type Config = {
  'call-super-in-constructor': 'error' | 'warn' | 'off';
  'use-this-in-method': 'error' | 'warn' | 'off';
};

console.log('Welcome to the Lint CLI!');

const helpMessage = 'Usage: analyze-ast-cli <file-path> [--debug]';

// コマンドの引数を取得(0番目はnodeの実行パス、1番目はスクリプトのパスなので省く)
const args = process.argv.slice(2);
// 引数が不足している場合はヘルプメッセージを表示
if (args.length === 0) {
  info(helpMessage);
  process.exit(1);
}

let [inputFilePath, ...restArgs] = args;
// コマンドの1つ目の引数に、入力ファイルパスが指定されていない場合はエラーにする
if (!inputFilePath || inputFilePath.startsWith('--')) {
  error('Input file path is required');
  info(helpMessage);
  process.exit(1);
}

// コマンドが実行されたディレクトリにconfigファイルがない場合はエラーにする
const configFilePath = path.resolve('config.json');
const isConfigFileExists = await fs.access(configFilePath).then(() => true).catch(() => false);
if (!isConfigFileExists) {
  error('Config file not found: config.json');
  process.exit(1);
}

for (let i = 0; i < restArgs.length; i++) {
  const arg = restArgs[i];

  if (arg === '--debug') {
    // --debugオプションが指定された場合、デバッグモードを有効にする
    process.env.DEBUG = 'true';
  } else {
    error(`Unknown argument: ${arg}`);
    process.exit(1);
  }
}

// 入力ファイルを読み込む
try {
  const absoluteInputPath = path.resolve(inputFilePath);
  const data = (await fs.readFile(absoluteInputPath)).toString();

  debug(`Input file path: ${absoluteInputPath}`);
  debug(`Input file content:\n${data}`);

  // configファイルを読み込む
  const config: Config = JSON.parse(
    (await fs.readFile(configFilePath)).toString()
  );
  debug(`Config file content:\n${JSON.stringify(config, null, 2)}`);

  const ast = await createAst(absoluteInputPath);

  // AST を走査して情報を出力する
  // 追加: 開始
  const violated = checkAst(ast, 0, config);
  if (!violated) {
    info('No issues found');
  }
  // 追加: 終了
} catch (err) {
  if (err instanceof Error) {
    error(err.message);
  } else {
    error('An unknown error occurred');
  }
  process.exit(1);
}
以上で、コンフィグのcall-super-in-constructorルールによるLintが可能になりました。試しに、ルールに違反している入力ファイルを作成し、エラーが表示されるか確認してみましょう。
__mocks__ディレクトリのvalidInput.tsファイルをinvalidInput.tsファイルにコピーします。invalidInput.tsファイルは__mocks__ディレクトリ内に配置してください。
__mocks__
├── invalidInput.ts # validInput.tsファイルからコピー
└── validInput.ts
invalidInput.tsファイルを開き、constructor内のsuperを呼び出している箇所を削除します。
class Animal {
  species: string;

  constructor(species: string) {
    this.species = species;
  }

  showSpecies() {
    console.log(`この動物は ${this.species} です。`);
  }

  eat(food: string) {
    console.log(`${this.species} は ${food} を食べています。`);
  }

  sleep(hours: number) {
    console.log(`${this.species} は ${hours} 時間眠ります。`);
  }

  move(distance: number) {
    console.log(`${this.species} は ${distance} メートル移動しました。`);
  }
}

class Dog extends Animal {
  name: string;
  age: number;

  constructor(
    name: string,
    age: number
  ) {
    // 削除: superの呼び出しを削除

    this.name = name;
    this.age = age;
  }

  showInfo() {
    console.log(`名前: ${this.name}, 年齢: ${this.age}`);
  }

  bark() {
    console.log(`${this.name} が吠えました: ワンワン!`);
  }
}

const pochi = new Dog('ポチ', 3);
pochi.showSpecies();                // この動物は Dog です。
pochi.eat('ドッグフード');          // Dog は ドッグフード を食べています。
pochi.sleep(8);                     // Dog は 8 時間眠ります。
pochi.move(10);                     // Dog は 10 メートル移動しました。
pochi.showInfo();                   // 名前: ポチ, 年齢: 3
pochi.bark();                       // ポチ が吠えました: ワンワン!
ターミナルからnpm run dev -- ./lintCli.ts ./__mocks__/invalidInput.tsを実行すると、以下のようなエラーの出力を得られます。
$ npm run dev -- ./lintCli.ts ./__mocks__/invalidInput.ts

> 003-analyze-ast@1.0.0 dev
> node --experimental-default-config-file ./lintCli.ts ./__mocks__/invalidInput.ts

Welcome to the Lint CLI!
[ERROR] Constructor should call super() but does not
エラーが起きていない場合も試しましょう。ターミナルからnpm run dev -- ./lintCli.ts ./__mocks__/validInput.tsを実行すると、以下のようにエラーが存在しない旨の出力を得られます。
$ npm run dev -- ./lintCli.ts ./__mocks__/validInput.ts

> 003-analyze-ast@1.0.0 dev
> node --experimental-default-config-file ./lintCli.ts ./__mocks__/validInput.ts

Welcome to the Lint CLI!
[INFO] No issues found
同様に、コンフィグのuse-this-in-methodルールにも対応します。checkAst.tsファイルを開き、// 追加: 開始と// 追加: 終了で囲われた処理を追加します。
import type { AstNode } from './createAst.ts';
import type { Config } from './lintCli.ts';
import { debug, error, info, warn } from './console.ts';

export function checkAst(astNode: AstNode, depth = 0, config: Config) {
  const indent = '  '.repeat(depth);
  debug(
    `${indent}Kind: ${astNode.kind}, Text: ${astNode.text.replaceAll('\n', ' ').slice(0, 20)}`
  );

  // ルール違反があるかどうかのフラグ
  let hasViolation = false;
  // configのcall-super-in-constructorが有効な場合、ルールを適用してASTを検査する
  if (
    config['call-super-in-constructor'] !== 'off' &&
    astNode.kind === 'ClassDeclaration' &&
    // extendsキーワードが存在する場合、親クラスがあると判断する
    astNode.children.some((child) => child.kind === 'HeritageClause')
  ) {
    // ClassDeclarationのASTノードの中からConstructorのASTノードを探す
    const constructor = astNode.children.find(
      (child) => child.kind === 'Constructor'
    );
    if (!constructor) return;

    // ConstructorのASTノードの中からBlockのASTノードを探す
    const block = constructor.children.find((child) => child.kind === 'Block');
    if (!block) return;

    // BlockのASTノードの中からExpressionStatementのASTノードを探す
    const expressionStatement = block.children.find(
      (child) => child.kind === 'ExpressionStatement'
    );
    if (!expressionStatement) return;

    // ExpressionStatementのASTノードの中からCallExpressionのASTノードを探す
    const callExpression = expressionStatement.children.find(
      (child) => child.kind === 'CallExpression'
    );
    // CallExpressionのASTノードが見つからない場合は、super()が呼び出されていないと判断する
    // また、CallExpressionのtextに'super'が含まれていない場合も同様にする
    if (!callExpression || !callExpression.text.includes('super')) {
      const message = 'Constructor should call super() but does not';
      if (config['call-super-in-constructor'] === 'error') {
        error(message);
      }
      if (config['call-super-in-constructor'] === 'warn') {
        warn(message);
      }
      hasViolation = true;
    }
  }

  // 追加: 開始
  // configのuse-this-in-methodが有効な場合、ルールを適用してASTを検査する
  if (
    config['use-this-in-method'] !== 'off' &&
    astNode.kind === 'ClassDeclaration'
  ) {
    const methodDeclarations = astNode.children.filter(
      (child) => child.kind === 'MethodDeclaration'
    );
    if (methodDeclarations.length === 0) return;

    const blocks = methodDeclarations.flatMap((method) =>
      method.children.filter((child) => child.kind === 'Block')
    );
    if (blocks.length === 0) return;

    const isAllMethodsUsingThis = blocks.every((block) => {
      return block.text.includes('this.');
    });
    if (!isAllMethodsUsingThis) {
      const message = 'Method should use `this` but does not';
      if (config['use-this-in-method'] === 'error') {
        error(message);
      }
      if (config['use-this-in-method'] === 'warn') {
        warn(message);
      }
      hasViolation = true;
    }
  }
  // 追加: 終了

  for (const child of astNode.children) {
    if (checkAst(child, depth + 1, config)) {
      hasViolation = true;
    }
  }

  return hasViolation;
}
以上で、コンフィグのuse-this-in-methodルールによるLintが可能になりました。試しに、invalidInput.tsファイルを変更し、エラーが表示されるか確認してみましょう。
invalidInput.tsファイルを開き、// 追加: 開始と// 追加: 終了で囲われた処理を追加します。
class Animal {
  species: string;

  constructor(species: string) {
    this.species = species;
  }

  showSpecies() {
    console.log(`この動物は ${this.species} です。`);
  }

  eat(food: string) {
    console.log(`${this.species} は ${food} を食べています。`);
  }

  sleep(hours: number) {
    console.log(`${this.species} は ${hours} 時間眠ります。`);
  }

  move(distance: number) {
    console.log(`${this.species} は ${distance} メートル移動しました。`);
  }
}

class Dog extends Animal {
  name: string;
  age: number;

  constructor(
    name: string,
    age: number
  ) {
    this.name = name;
    this.age = age;
  }

  showInfo() {
    console.log(`名前: ${this.name}, 年齢: ${this.age}`);
  }

  bark() {
    console.log(`${this.name} が吠えました: ワンワン!`);
  }

  // 追加: 開始
  noThisMethod() {
    console.log('This method should not be called.');
  }
  // 追加: 終了
}

const pochi = new Dog('ポチ', 3);
pochi.showSpecies();                // この動物は Dog です。
pochi.eat('ドッグフード');          // Dog は ドッグフード を食べています。
pochi.sleep(8);                     // Dog は 8 時間眠ります。
pochi.move(10);                     // Dog は 10 メートル移動しました。
pochi.showInfo();                   // 名前: ポチ, 年齢: 3
pochi.bark();                       // ポチ が吠えました: ワンワン!
ターミナルからnpm run dev -- ./lintCli.ts ./__mocks__/invalidInput.tsを実行すると、以下のようなエラーの出力を得られます。
$ npm run dev -- ./lintCli.ts ./__mocks__/invalidInput.ts

> 003-analyze-ast@1.0.0 dev
> node --experimental-default-config-file ./lintCli.ts ./__mocks__/invalidInput.ts

Welcome to the Lint CLI!
[ERROR] Constructor should call super() but does not
[ERROR] Method should use `this` but does not
以上で、Lint向けのCLIの実装が完了しました。完成したファイルは以下の通りです。
checkAst.ts
import type { AstNode } from './createAst.ts';
import type { Config } from './lintCli.ts';
import { debug, error, warn } from './console.ts';

export function checkAst(astNode: AstNode, depth = 0, config: Config) {
  const indent = '  '.repeat(depth);
  debug(
    `${indent}Kind: ${astNode.kind}, Text: ${astNode.text.replaceAll('\n', ' ').slice(0, 20)}`
  );

  // ルール違反があるかどうかのフラグ
  let hasViolation = false;
  // configのcall-super-in-constructorが有効な場合、ルールを適用してASTを検査する
  if (
    config['call-super-in-constructor'] !== 'off' &&
    astNode.kind === 'ClassDeclaration' &&
    // extendsキーワードが存在する場合、親クラスがあると判断する
    astNode.children.some((child) => child.kind === 'HeritageClause')
  ) {
    // ClassDeclarationのASTノードの中からConstructorのASTノードを探す
    const constructor = astNode.children.find(
      (child) => child.kind === 'Constructor'
    );
    if (!constructor) return;

    // ConstructorのASTノードの中からBlockのASTノードを探す
    const block = constructor.children.find((child) => child.kind === 'Block');
    if (!block) return;

    // BlockのASTノードの中からExpressionStatementのASTノードを探す
    const expressionStatement = block.children.find(
      (child) => child.kind === 'ExpressionStatement'
    );
    if (!expressionStatement) return;

    // ExpressionStatementのASTノードの中からCallExpressionのASTノードを探す
    const callExpression = expressionStatement.children.find(
      (child) => child.kind === 'CallExpression'
    );
    // CallExpressionのASTノードが見つからない場合は、super()が呼び出されていないと判断する
    // また、CallExpressionのtextに'super'が含まれていない場合も同様にする
    if (!callExpression || !callExpression.text.includes('super')) {
      const message = 'Constructor should call super() but does not';
      if (config['call-super-in-constructor'] === 'error') {
        error(message);
      }
      if (config['call-super-in-constructor'] === 'warn') {
        warn(message);
      }
      hasViolation = true;
    }
  }

  // configのuse-this-in-methodが有効な場合、ルールを適用してASTを検査する
  if (
    config['use-this-in-method'] !== 'off' &&
    astNode.kind === 'ClassDeclaration'
  ) {
    const methodDeclarations = astNode.children.filter(
      (child) => child.kind === 'MethodDeclaration'
    );
    if (methodDeclarations.length === 0) return;

    const blocks = methodDeclarations.flatMap((method) =>
      method.children.filter((child) => child.kind === 'Block')
    );
    if (blocks.length === 0) return;

    const isAllMethodsUsingThis = blocks.every((block) => {
      return block.text.includes('this.');
    });
    if (!isAllMethodsUsingThis) {
      const message = 'Method should use `this` but does not';
      if (config['use-this-in-method'] === 'error') {
        error(message);
      }
      if (config['use-this-in-method'] === 'warn') {
        warn(message);
      }
      hasViolation = true;
    }
  }

  for (const child of astNode.children) {
    if (checkAst(child, depth + 1, config)) {
      hasViolation = true;
    }
  }

  return hasViolation;
}
lintCli.ts
#!/usr/bin/env node

// Node.jsのモジュールをインポート
import fs from 'node:fs/promises';
import path from 'node:path';
// カスタムコンソールモジュールをインポート
import { debug, error, info } from './console.ts';
import { createAst } from './createAst.ts';
import { checkAst } from './checkAst.ts';

// configの型を定義
export type Config = {
  'call-super-in-constructor': 'error' | 'warn' | 'off';
  'use-this-in-method': 'error' | 'warn' | 'off';
};

console.log('Welcome to the Lint CLI!');

const helpMessage = 'Usage: lint-cli <file-path> [--debug]';

// コマンドの引数を取得(0番目はnodeの実行パス、1番目はスクリプトのパスなので省く)
const args = process.argv.slice(2);
// 引数が不足している場合はヘルプメッセージを表示
if (args.length === 0) {
  info(helpMessage);
  process.exit(1);
}

let [inputFilePath, ...restArgs] = args;
// コマンドの1つ目の引数に、入力ファイルパスが指定されていない場合はエラーにする
if (!inputFilePath || inputFilePath.startsWith('--')) {
  error('Input file path is required');
  info(helpMessage);
  process.exit(1);
}

// コマンドが実行されたディレクトリにconfigファイルがない場合はエラーにする
const configFilePath = path.resolve('config.json');
const isConfigFileExists = await fs.access(configFilePath).then(() => true).catch(() => false);
if (!isConfigFileExists) {
  error('Config file not found: config.json');
  process.exit(1);
}

for (let i = 0; i < restArgs.length; i++) {
  const arg = restArgs[i];

  if (arg === '--debug') {
    // --debugオプションが指定された場合、デバッグモードを有効にする
    process.env.DEBUG = 'true';
  } else {
    error(`Unknown argument: ${arg}`);
    process.exit(1);
  }
}

// 入力ファイルを読み込む
try {
  const absoluteInputPath = path.resolve(inputFilePath);
  const data = (await fs.readFile(absoluteInputPath)).toString();

  debug(`Input file path: ${absoluteInputPath}`);
  debug(`Input file content:\n${data}`);

  // configファイルを読み込む
  const config: Config = JSON.parse(
    (await fs.readFile(configFilePath)).toString()
  );
  debug(`Config file content:\n${JSON.stringify(config, null, 2)}`);

  const ast = await createAst(absoluteInputPath);

  // AST を走査して情報を出力する
  const violated = checkAst(ast, 0, config);
  if (!violated) {
    info('No issues found');
  }
} catch (err) {
  if (err instanceof Error) {
    error(err.message);
  } else {
    error('An unknown error occurred');
  }
  process.exit(1);
}
CLIを公開する
最後に、実装した2つのCLIをnpmに公開しましょう。npmのアカウント作成や公開手順の詳細は前回を参照してください。
package.jsonを開き、binフィールドにlint-cliを追加します。
{
  "name": "003-analyze-ast",
  // ~~~
  "bin": {
    "analyze-ast-cli": "./dist/analyzeAstCli.js",
    "lint-cli": "./dist/lintCli.js"
  },
  // ~~~
}
ターミナルから以下のコマンドを実行し、lint-cliが正常に動作するか確認します。
$ npm run build

> 003-analyze-ast@1.0.0 build
> tsc

$ npx lint-cli
Welcome to the Lint CLI!
[INFO] Usage: lint-cli <file-path> [--debug]
package.jsonを開き、filesフィールドにdistを追加します。
{
  "name": "003-analyze-ast",
  // ~~~
  "files": [
    "dist"
  ],
  // ~~~
}
package.jsonのnameフィールドを@<npmのアカウントid>/003-analyze-astに書き換えます。
{
  "name": "@did0es/003-analyze-ast"
  // ~~~
}
ターミナルから以下のコマンドを実行し、typescriptパッケージをpublishするプロジェクトに含められるようにします。
$ npm uninstall typescript

$ npm install typescript@5.8.3 # dependenciesにインストールする
ターミナルから以下でnpmにログイン後、dry-runで内容を確認し、問題なければ公開します。
$ npm login

$ npm publish --access public --dry-run # dry-runなので実際にpublishはされない

$ npm publish --access public # publish
公開したパッケージをインストールして使ってみましょう。ターミナルから以下のコマンドを実行します。
$ npm install --global @did0es/003-analyze-ast@latest

$ asdf reshim nodejs # nodejsのバージョン管理にasdfを使っている場合、reshimを実行する
analyze-ast-cliとlint-cliを実行できれば完了です。お疲れ様でした!
$ analyze-ast-cli
Welcome to the Analyze AST CLI!
[INFO] Usage: analyze-ast-cli <file-path> [--debug]

$ lint-cli
Welcome to the Lint CLI!
[INFO] Usage: lint-cli <file-path> [--debug]
以上のコードはGitHubのリポジトリに掲載しています。併せてご覧ください。
次回は、今回実装したLint向けCLIをベースに、ソースコードを自動修正できるようにします。
【参考文献】