画面上を流れる数字を暗算して正解を求めるアプリを作ろう(その1)
空白のページの作成(InputAnswerPage.xaml)
VS2013のメニューから、[プロジェクト]−[新しい項目の追加]と選択し、表示される「新しい項目の追加」画面で。左のWindows ストアを選択し、右の欄から「空白のページ」を選択します。「名前」にはInputAnswerPage.xaml」と指定し、[追加] ボタンをクリックします。「InputAnserPage.xaml」暗算した答えを入力して判定し、判定結果をキャラクタが喋るページです。
コントロールのレイアウト(goPage.xaml)
ツールボックスからデザイン画面上に、各コントロールを配置します。
書き出されるXAMLコードはリスト4のようになります。
リスト4 書き出されたXAMLコード(InputAnswerPage.xaml)
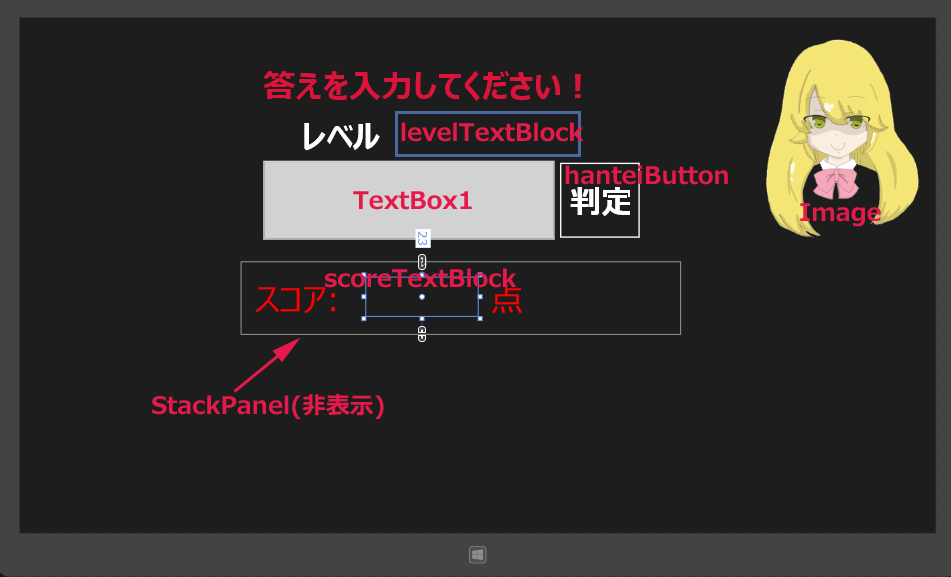
(1)「答えを入力してください!」と表示するTextBlock要素を配置します。
(2)「TextBox1」という名前の、答えを入力するTextBox要素を配置します。
(3)項目名となる「レベル」と表示するTextBlock要素を配置します。
(4)「levelTextBlock」という名前のTextBlock要素を配置します。ここにはレベルが表示されます。
(5)「hanteiButton」という名前のButton要素を配置します。
(6)StackPanel要素を配置し、Orientationに「Horizontal」と指定します。このStackPanelは最初の状態では非表示にしています。よって、StackPanelの子要素も非表示になります。子要素として、「スコア」という項目名となるTextBlock要素を配置します。次に「scoreTextBlock」という名前のTextBlock要素を配置すると、スコアが表示されます。さらに、例えば「スコア:10点」と表示されるように、「点」という項目名を表示するTextBlock要素を配置します。
(7)キャラクタを表示するImage要素を配置します。SourceプロパティにImagesフォルダ内のPNG画像を指定しています。
(8)「MediaElement1」という名前のMediaElement要素を配置します。キャラクタに音声を喋らすのに必要です。
以上、全てをレイアウトしたのが図9になります。
<Page
  x:Class="DynamicVisualAcuityMentalArithmetic.InputAnswerPage"
  xmlns="http://schemas.microsoft.com/winfx/2006/xaml/presentation"
  xmlns:x="http://schemas.microsoft.com/winfx/2006/xaml"
  xmlns:local="using:DynamicVisualAcuityMentalArithmetic"
  xmlns:d="http://schemas.microsoft.com/expression/blend/2008"
  xmlns:mc="http://schemas.openxmlformats.org/markup-compatibility/2006"
  mc:Ignorable="d">

  <Grid Background="{ThemeResource ApplicationPageBackgroundThemeBrush}">
    <TextBlock HorizontalAlignment="Left" Height="69" Margin="363,69,0,0" TextWrapping="Wrap" Text="答えを入力してください!" VerticalAlignment="Top" Width="750" FontFamily="Meiryo UI" FontSize="48" FontWeight="Bold" Foreground="Crimson"/>■(1)
    <TextBox x:Name="TextBox1" HorizontalAlignment="Left" Height="118" Margin="363,213,0,0" TextWrapping="Wrap"  VerticalAlignment="Top" Width="435" FontFamily="Meiryo UI" FontSize="72" FontWeight="Bold"/>■(2)
    <TextBlock HorizontalAlignment="Left" Height="65" Margin="421,143,0,0" TextWrapping="Wrap" Text="レベル" VerticalAlignment="Top" Width="133" FontFamily="Meiryo UI" FontSize="48" FontWeight="Bold"/>■(3)
    <TextBlock x:Name="levelTextBlock" HorizontalAlignment="Left" Height="65" Margin="586,138,0,0" TextWrapping="Wrap"  VerticalAlignment="Top" Width="258" FontFamily="Meiryo UI" FontSize="48" FontWeight="Bold" Foreground="Red"/>■(4)
    <Button x:Name="hanteiButton" Content="判定" HorizontalAlignment="Left" Height="118" Margin="803,213,0,0" VerticalAlignment="Top" Width="125" FontFamily="Meiryo UI" FontSize="48"/>■(5)
    <StackPanel x:Name="myStackPanel" HorizontalAlignment="Left" Height="108" Margin="331,364,0,0" VerticalAlignment="Top" Width="654" Orientation="Horizontal" Visibility="Collapsed">■(6)
      <TextBlock Height="58" Margin="20,23,0,0" TextWrapping="Wrap" Text="スコア:" VerticalAlignment="Top" Width="166" Foreground="Red" FontFamily="Meiryo UI" FontSize="48"/>■(6)
      <TextBlock x:Name="scoreTextBlock" Height="58" Margin="0,23,0,0" TextWrapping="Wrap"  VerticalAlignment="Top" Width="166" Foreground="Red" FontFamily="Meiryo UI" FontSize="48" HorizontalAlignment="Right"/>■(6)
      <TextBlock Height="58" Margin="20,23,0,0" TextWrapping="Wrap" Text="点" VerticalAlignment="Top" Width="166" Foreground="Red" FontFamily="Meiryo UI" FontSize="48"/>
    </StackPanel>■(6)
    <Image HorizontalAlignment="Left" Height="296" Margin="1113,32,0,0" VerticalAlignment="Top" Width="229" RenderTransformOrigin="1.04,0.339" Source="Images/newSyoko.png"/>■(7)
    <MediaElement x:Name="MediaElement1" HorizontalAlignment="Left" Height="37" Margin="925,32,0,0" VerticalAlignment="Top" Width="135"/>■(8)
  </Grid>
</Page>
空白のページの作成(ResultShowPage.xaml)
VS2013のメニューから、[プロジェクト]−[新しい項目の追加]と選択し、表示される「新しい項目の追加」画面で。左のWindows ストアを選択し、右の欄から「空白のページ」を選択します。「名前」には「ResultShowePage.xaml」と指定し、[追加] ボタンをクリックします。「ResultShowPage.xaml」はこれまでの戦績を一覧するページです。
コントロールのレイアウト(goPage.xaml)
ツールボックスからデザイン画面上に、各コントロールを配置します。
書き出されるXAMLコードはリスト5のようになります。
リスト5 書き出されたXAMLコード(ResultShowPage.xaml)
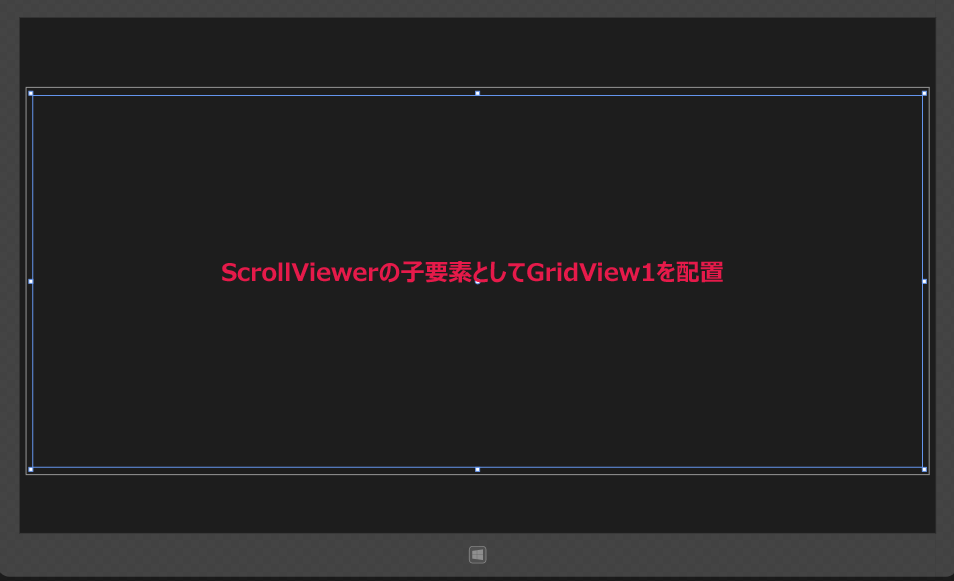
(1)Page.Resourcesプロパティ要素内に名前が「GridViewTemplate」というDataTemplate要素を配置します。その子要素として、StackPanel要素を配置し、背景色(Background)に「Navy」を指定します。その子要素として、7つのStackPanel要素を配置します。Orientationプロパティには「Horizontal」を指定し、その子要素として、項目名となるTextBlockコントロールと、値をバインドするTextBlock要素を配置します。上から順番にTextプロパティに「年月日」、「桁数」、「速度」、「文字サイズ」、「背景」、「レベル」、「スコア」をバインドします。これらの名称はVBコード内のクラスで定義されるプロパティ名です(後述)。
(2)ScrollViewer要素を配置し、その子要素として名前が「GridView1」というGridView要素を配置します。ItemTemplateプロパティで、StaticResourceを使って(1)で定義しておいたテンプレートを参照します。
<Page
  x:Class="DynamicVisualAcuityMentalArithmetic.ResultShowPage"
  xmlns="http://schemas.microsoft.com/winfx/2006/xaml/presentation"
  xmlns:x="http://schemas.microsoft.com/winfx/2006/xaml"
  xmlns:local="using:DynamicVisualAcuityMentalArithmetic"
  xmlns:d="http://schemas.microsoft.com/expression/blend/2008"
  xmlns:mc="http://schemas.openxmlformats.org/markup-compatibility/2006"
  mc:Ignorable="d">
  <Page.Resources>■(1)
    <DataTemplate x:Key="GridViewTemplate">■(1)
      <StackPanel Background="Navy" Margin="5">■(1)
        <StackPanel Orientation="Horizontal">■(1)
          <TextBlock Text="年月日:" FontSize="20" Padding="5"/>■(1)
          <TextBlock Text="{Binding 年月日}" FontSize="18" Padding="5" Foreground="Gold"/>■(1)
        </StackPanel>■(1)
        <StackPanel Orientation="Horizontal">■(1)
          <TextBlock Text="桁数:" FontSize="20" Padding="5"/>■(1)
          <TextBlock Text="{Binding 桁数}" FontSize="18" Padding="5" Foreground="Gold"/>■(1)
        </StackPanel>■(1)
        <StackPanel Orientation="Horizontal">■(1)
          <TextBlock Text="速度:" FontSize="20" Padding="5"/>■(1)
          <TextBlock Text="{Binding 速度}" FontSize="18" Padding="5" Foreground="Gold"/>■(1)
        </StackPanel>■(1)
        <StackPanel Orientation="Horizontal">■(1)
          <TextBlock Text="文字サイズ:" FontSize="20" Padding="5"/>■(1)
          <TextBlock Text="{Binding 文字サイズ}" FontSize="18" Padding="5" Foreground="Gold"/>■(1)
        </StackPanel>■(1)
        <StackPanel Orientation="Horizontal">■(1)
          <TextBlock Text="背景:" FontSize="20" Padding="5"/>■(1)
          <TextBlock Text="{Binding 背景}" FontSize="18" Padding="5" Foreground="Gold"/>■(1)
        </StackPanel>■(1)
        <StackPanel Orientation="Horizontal">■(1)
          <TextBlock Text="レベル:" FontSize="20" Padding="5"/>■(1)
          <TextBlock Text="{Binding レベル}" FontSize="18" Padding="5" Foreground="Gold"/>■(1)
        </StackPanel>■(1)
        <StackPanel Orientation="Horizontal">■(1)
          <TextBlock Text="スコア:" FontSize="20" Padding="5"/>■(1)
          <TextBlock Text="{Binding スコア}" FontSize="18" Padding="5" Foreground="Gold"/>■(1)
        </StackPanel>■(1)
      </StackPanel>■(1)
    </DataTemplate>■(1)
  </Page.Resources>■(1)
  <Grid Background="{ThemeResource ApplicationPageBackgroundThemeBrush}">
    <ScrollViewer HorizontalAlignment="Left" Height="577" Margin="10,104,0,0" VerticalAlignment="Top" Width="1346">■(2)
      <GridView Height="554" Width="1326" x:Name="GridView1" ItemTemplate="{StaticResource GridViewTemplate}"/>■(2)
    </ScrollViewer>■(2)
  </Grid>
</Page>
以上、全てをレイアウトしたのが図10になります。
今回はここまでです。次回は「モジュールの設定」、MainWindow.xaml.vbコードの解説から入ります。次回はコードがメインの内容になりますので、今回とあわせて読むことをおすすめします。
では、次の記事でお会いしましょう。


連載バックナンバー


Think ITメルマガ会員登録受付中
他にもこの記事が読まれています


全文検索エンジンによるおすすめ記事
- キャラクターが声で天気予報を教えてくれるアプリを作る
- キャラクターが音声で応援してくれる脳トレーニングアプリを作ってみよう
- 四文字熟語の意味をキャラクターが声で教えてくれるアプリを作る
- 時刻とともに、その日の出来事をキャラクターが音声で教えてくれるアプリを作る
- 画面サイズに合わせて入力ボックスを並び変える
- 住所から郵便番号を検索できるプログラムを作る
- 世界の観光地情報を眺めるサンプルプログラム
- ちょっとした英訳を知りたい時に使える、デ辞蔵のREST APIを使った和英辞典プログラム
- 婚活に使えるお見合いパーティ検索アプリを作る
- 指定した目的地までの距離をキャラクターが教えてくれるアプリを作ろう