TFXを使った機械学習パイプラインの構築(実装編その2)

はじめに
前回は、TFXを使った機械学習パイプラインの構築のうち「実装編その1」として、その前半部分となる「データ準備」で利用するTFXコンポーネント解説や実装を行いました。今回は、「実装編その2」として、後半部分の「モデル作成」の各ステップで利用するTFXコンポーネントの解説や実装に入っていきます。
機械学習パイプラインの構築(ハンズオン)
本稿では、機械学習パイプラインのうち「モデル作成」に含まれる「モデル学習」と「チューニング」のステップについて解説します。
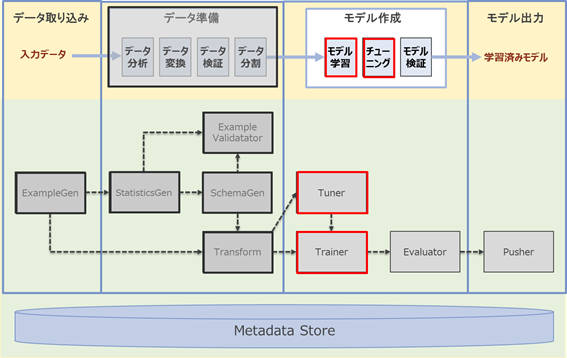
図1:機械学習パイプラインの各ステップとコンポーネント
赤枠の部分が本稿の範囲となり、黒枠の部分は実装済みであることが前提となります。前回の「データ準備」で用意した学習用と評価用のデータを利用し、今回は「モデル学習」と「チューニング」を行うステップをパイプラインに組み込んでいきます。
解説の流れ
「モデル学習」、「チューニング」の各ステップで利用するTFXコンポーネントについて、実装例を交えて解説します。
- モデル学習:Trainerコンポーネントを使ってモデル学習ステップの解説と実装を行います。ここでは、本連載の第3回で解説したモデルをベースにモデル学習をパイプラインに組み込みます
- チューニング:Tunerコンポーネントを使って、チューニングステップの解説と実装を行います。ここでは、モデル学習プロセスの一つである「ハイパーパラメータチューニング」をパイプラインに組み込みます
機械学習パイプライン構築の進め方
前回と同様に、TFXの「インタラクティブパイプライン」という機能を利用し、TFXコンポーネントの実行結果を確認しながら段階的に実装を進めていきます。以降、解説で用いるコード例を上から順番にJupyter notebookのセルに入力し実行していくことで、機械学習パイプラインの構築が進んでいきます。
事前準備
前回利用したノートブックサーバーおよびPython3のノートブック(.ipynb)ファイルを引き続き利用します。また、「チューニング」のステップでKerasTunerの追加が必要なため、次のコマンドをノートブックのセルに入力しライブラリをインストールします。
!pip install keras-tuner==1.0.2
モデル学習
TrainerというTFXコンポーネントを使って、モデル学習のステップを機械学習パイプラインに組み込む方法について解説します。
- Trainerとは
Trainerはモデル学習を行うTFXコンポーネントです。Trainerでは主に次の入力を必要とします。
- 前回「データ変換」のステップで実装したデータ変換処理のグラフ
- 前回「データ検証」のステップで生成したデータスキーマ
- 前回「データ分割」のステップで説明した学習用データと評価用データ
- 学習パラメータ(学習ステップ、エポック数など)
- 学習プロセスを定義する「run_fn関数」を含むモジュールファイル
ここで重要なポイントの一つとして、データ変換処理のグラフを入力するところが挙げられます。データ変換処理のグラフとは、前回Transformコンポーネントで実装したデータ変換処理を保存したものを示します。つまり、Trainerコンポーネントで作成するモデルは、データ変換処理を含めた形で出力でき、このモデルをデプロイすると推論処理の一部としてデータ変換処理をモデルサーバー上で実行します。これによって、前回解説した「学習・推論間でのスキュー」を回避できるのです。
それでは、まずモデル定義を行います。なお、Trainerで実装した処理をパイプラインとして組み込む際は、モジュールファイル化(.pyファイル化)する必要があるため、ノートブック上で実行するとともにモジュールファイルとして書き出しを行います。
trainer_module_without_tuning_file_name = 'adult_income_trainer_module_without_tuning.py'
trainer_module_without_tuning_file_path = os.path.join(os.getcwd(), trainer_module_without_tuning_file_name)
次にモデル定義を記述します。
クリックして表示
%%writefile {trainer_module_without_tuning_file_path}

import absl
import os
import sys

from typing import List, Text

import kerastuner
import tensorflow as tf
import tensorflow_transform as tft

from tensorflow.keras import Model
from tensorflow.keras.models import Sequential
from tensorflow.keras.layers import Dense, Input, concatenate

from tfx.components.trainer.fn_args_utils import DataAccessor
from tfx.components.trainer.executor import TrainerFnArgs
from tfx_bsl.tfxio import dataset_options

NUMERIC_FEATURE_KEYS = [
    'age',
    'education-num',
    'capital-gain',
    'capital-loss',
    'hours-per-week',
]
ONE_HOT_FEATURES = {'workclass': 8,
                    'education': 16,
                    'marital-status': 7,
                    'occupation': 14,
                    'relationship': 6,
                    'gender': 2
                   }
LABEL_KEY = 'income'

def transformed_name(key):
    return key + '_xf'

def create_model():
    model = Sequential()

    inputs = []
    for key in NUMERIC_FEATURE_KEYS:
        inputs.append(Input(shape=(1), name=transformed_name(key)))
    for key, dim in ONE_HOT_FEATURES.items():
        for i in range(0, dim):
            inputs.append(Input(shape=(1), name=transformed_name(key + '_' + str(i))))

    outputs = concatenate(inputs)
    units = 100
    outputs = Dense(units, activation='relu')(outputs)
    outputs = Dense(units, activation='relu')(outputs)
    outputs = Dense(1, activation='sigmoid')(outputs)

    model = Model(inputs=inputs, outputs=outputs)
    model.compile(optimizer='adam', loss='binary_crossentropy', metrics=['accuracy'])
    model.summary()
    return model
次に「run_fn関数」を実装します。Trainerコンポーネントはモジュールファイル内に定義された「run_fn関数」を検索し、学習プロセスを実行するためのエントリポイントとして使用します。この関数では次の処理を実装します。
- 学習用と評価用のデータの読み込み
- モデルのコンパイル
- モデルの学習
- モデルの保存
では、「run_fn関数」実装します。
%%writefile -a {trainer_module_without_tuning_file_path}

def run_fn(fn_args: TrainerFnArgs):
    tf_transform_output = tft.TFTransformOutput(fn_args.transform_output)
    train_dataset = input_fn(fn_args.train_files, fn_args.data_accessor,
                                tf_transform_output, 40)
    eval_dataset = input_fn(fn_args.eval_files, fn_args.data_accessor,
                               tf_transform_output, 40)

    tensorboard_callback = tf.keras.callbacks.TensorBoard(
        log_dir = fn_args.model_run_dir, update_freq='batch'
    )

    model = create_model()
    model.fit(
        train_dataset,
        epochs = fn_args.custom_config["epoch"],
        steps_per_epoch = fn_args.train_steps,
        validation_data = eval_dataset,
        validation_steps = fn_args.eval_steps,
        callbacks = [tensorboard_callback]
    )

    signatures = {
        'serving_default':
            get_tf_examples_serving_signature(model, tf_transform_output),
        'transform_features':
            get_transform_features_signature(model, tf_transform_output),
    }
    model.save(fn_args.serving_model_dir, save_format='tf', signatures=signatures)
次に「run_fn関数」に記述した以下のヘルパー関数を定義します。
- input_fn関数
- get_tf_examples_serving_signature関数
- get_transform_features_signature関数
「input_fn関数」は、変換処理済みの学習用および評価用のデータセットを読み込みます。TFRecordからデータセットを読み込むために、変換処理済みのスキーマを引数として渡します。また、学習時にモデルに与えるデータのバッチサイズを指定します。
%%writefile -a {trainer_module_without_tuning_file_path}

def input_fn(file_pattern: List[Text],
             data_accessor: DataAccessor,
             tf_transform_output: tft.TFTransformOutput,
             batch_size: int = 200) -> tf.data.Dataset:
    return data_accessor.tf_dataset_factory(
        file_pattern,
        dataset_options.TensorFlowDatasetOptions(
            batch_size=batch_size, label_key=transformed_name(LABEL_KEY)),
        tf_transform_output.transformed_metadata.schema)
「get_tf_examples_serving_signature関数」は、モデルの入力にデータ変換グラフを適用します。これにより、モデルをデプロイした際に予測リクエストはデータ変換処理され、実行されます。
%%writefile -a {trainer_module_without_tuning_file_path}

def get_tf_examples_serving_signature(model, tf_transform_output):
    model.tft_layer_inference = tf_transform_output.transform_features_layer()

    @tf.function(input_signature=[
        tf.TensorSpec(shape=[None], dtype=tf.string, name='examples')
    ])
    def serve_tf_examples_fn(serialized_tf_example):
        raw_feature_spec = tf_transform_output.raw_feature_spec()
        raw_feature_spec.pop(LABEL_KEY)
        raw_features = tf.io.parse_example(serialized_tf_example, raw_feature_spec)
        transformed_features = model.tft_layer_inference(raw_features)

        outputs = model(transformed_features)
        return {'outputs': outputs}

    return serve_tf_examples_fn
「get_transform_features_signature関数」は、後続のモデル評価のステップでモデルの入力にデータ変換グラフを適用するために定義します。
%%writefile -a {trainer_module_without_tuning_file_path}

def get_transform_features_signature(model, tf_transform_output):
    model.tft_layer_eval = tf_transform_output.transform_features_layer()

    @tf.function(input_signature=[
        tf.TensorSpec(shape=[None], dtype=tf.string, name='examples')
    ])
    def transform_features_fn(serialized_tf_example):
        raw_feature_spec = tf_transform_output.raw_feature_spec()
        raw_features = tf.io.parse_example(serialized_tf_example, raw_feature_spec)
        transformed_features = model.tft_layer_eval(raw_features)
        return transformed_features

    return transform_features_fn
次に、パイプラインの実行時に利用するために、モジュールファイルをMinIOにアップロードします。
bucket.upload_file(trainer_module_without_tuning_file_path, 'module/%s' % trainer_module_without_tuning_file_name)
モデル学習を実行します。
param_trainer_module_file = '%s/module/%s' % (bucket_name_s3_prefix, trainer_module_without_tuning_file_name)
param_trainer_train_args = {"num_steps": 100}
param_trainer_eval_args = {"num_steps": 50}
param_trainer_custom_config_args = {"epoch": 25}

trainer_without_tuner = tfx.components.Trainer(
    module_file = param_trainer_module_file,
    custom_executor_spec = executor_spec.ExecutorClassSpec(GenericExecutor),
    examples = transform.outputs['transformed_examples'],
    transform_graph = transform.outputs['transform_graph'],
    schema = import_schema.outputs['result'],
    train_args = param_trainer_train_args,
    eval_args = param_trainer_eval_args,
    custom_config = param_trainer_custom_config_args)
context.run(trainer_without_tuner)
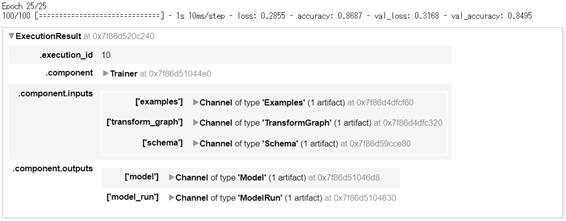
図2-1:Trainerの実行結果
学習用データを25回(エポック数で指定した回数)繰り返し学習し、最終的に評価用データセットに対しての正解率(val_accuracy)は、約85%となりました。