データを保存し氏名から詳細情報を表示する

このサンプルでは、入力した「氏名」、「住所」、「電話」、「E-mail」、「画像」データをサーバーに保存した後、「画像」と「氏名」だけを一覧で表示して、選択した「氏名」に該当する詳細データを表示します。「Windows Phone ピボットアプリケーション」以外に、サーバーに配置するASP.NETのプログラムが必要です。
まずは、このプログラムで実装する機能の動作を、下記に解説しておきます。
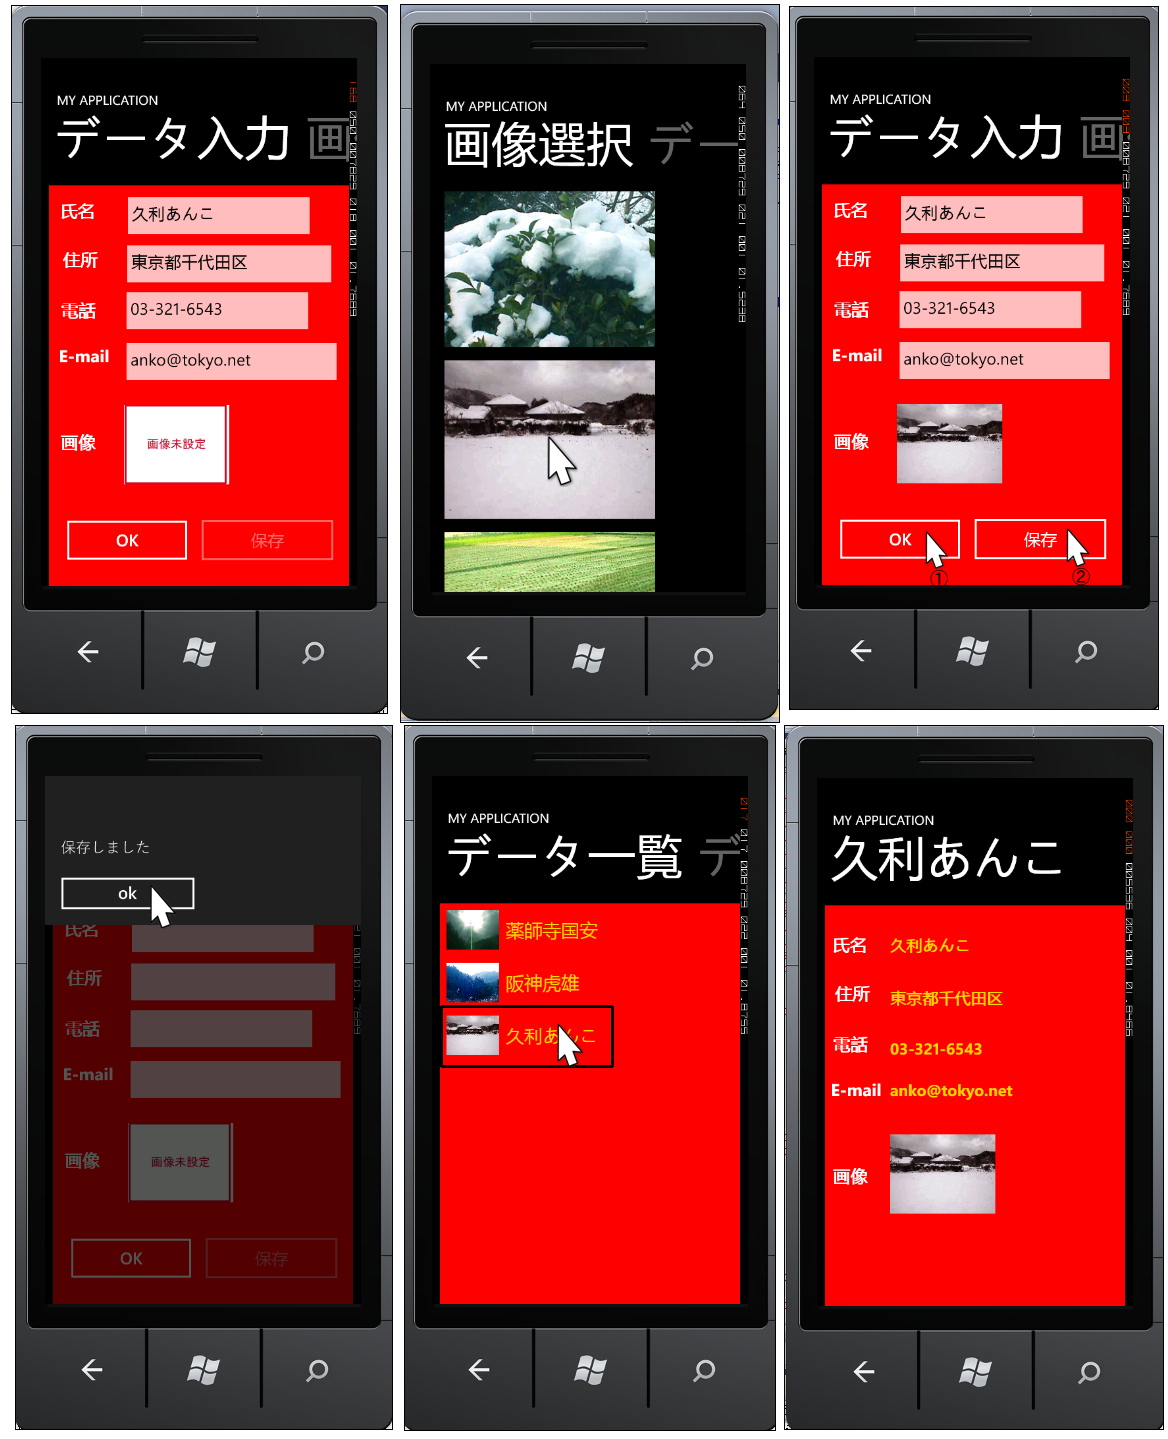
実行すると「氏名」、「住所」、「電話」、「E-mail」の入力ボックスが表示され、「画像」には横スライドして画像一覧中から好きな画像を選択します。画像を選択すると自動的に入力ページにスライドします。入力ページに戻り、[OK]ボタンを押して[保存]ボタンをクリックします。3ページ目に今保存したデータの「画像」と「氏名」の一覧が表示されています。任意の「氏名」クリックすると、Page Transition効果を伴って詳細データのページに遷移します(図1)。
|
|
| 図1:データを保存し、「画像」と「氏名」の一覧ページから任意の氏名を選択して、詳細データを表示する(クリックで拡大) |
サンプル一式は、会員限定特典としてダウンロードできます。記事末尾をご確認ください。
実機(IS12T)で動かした動画はこちらです。
プロジェクトの作成
VS 2010のメニューから[ファイル(F)/新規作成(N)/プロジェクト(P)]を選択します。次に、「Windows Phone ピボットアプリケーション」を選択して、「名前(N)」に任意のプロジェクト名を指定します。ここでは「ImageAndPersonalInfo」という名前を付けています。Windows Phoneのバージョンは7.1を選択します。
ソリューションエクスプローラー内にImageというフォルダーを作成し、画像を追加しておきます。またリスト1のXML文書ファイル(photo_etc.xml)も追加しておきます。ダウンロードしたサンプルファイルには、画像やXML文書ファイルは追加済みです。
またVS2010のメニューから「プロジェクト(P)/参照の追加(R)」と選択して、System.Xml.Linqを追加しておきます。
リスト1 XML文書ファイル(photo_etc.xml)
<?xml version="1.0"?>
<画像>
  <情報>
    <画像名>銀杏.jpg</画像名>
    <画像名>枯れ木.jpg</画像名>
    <画像名>光.jpg</画像名>
    <画像名>森林.jpg</画像名>
    <画像名>雪の日.jpg</画像名>
    <画像名>民家.jpg</画像名>
    <画像名>田んぼ.jpg</画像名>
    <画像名>冬の桜.jpg</画像名>
    <画像名>すすき.jpg</画像名>
    <画像名>青空.jpg</画像名>
  </情報>
</画像>
書き出されるXAMLコードをリスト2のように編集します。
MainPage.xamlの編集
リスト2 書き出され編集されたXAMLコード(MainPage.xaml)
(1)TurnstileTransitionm(画面が右から左に回転するトランジッション)のコードを追加しています。このコードを追加するには、VS2010メニューの「プロジェクト(P)/参照の追加(R)」から、Microsoft.Phone.Controls.Toolkitを追加する必要があります。また、<phone:PhoneApplicationPage>要素にtoolkitという名前空間を追加する必要があります。これらの手順については、「第1回:Bing APIを使ってWeb検索とImage検索を実装する」を参照してください。また、App.xaml内のコードを書きかえる点も忘れないようにしてください。
(2)Windows Phone 7.1 SDK 日本語版では、フォントの設定なしにアプリケーションを実行し、タイトルやテキストに日本語を使った場合、日本語フォントが使われないで変な表示になってしまうことがあります。これを解消するには、書き出されるXAMLコードのアプリケーションのトップである<phone:PhoneApplicationPage>要素内に、

Language=  "ja-JP"

と指定しておきます。
(3)<phone:PhoneApplicationPage.Resources>プロパティ要素内に、ListBoxTemplateというキーのテンプレートを定義します。<Image>要素を配置し、WidthとHeightの値を指定します。Sourceプロパティには、「画像名」をバインドしておきます。
(4)<phone:PhoneApplicationPage.Resources>プロパティ要素内に、dataListBoxTemplateというキーのテンプレートを定義します。<StackPanel>要素を配置し、OrientationプロパティにHorizontalを指定して、オブジェクトが水平にスタックされるようにします。中に<Image>と<TextBlock>要素を配置します。<Image> 要素のWidthとHeightを指定し、「画像」をバインドします。また、<TextBlock>要素のForeground(文字色)にGoldを指定し、Textプロパティに「氏名」をバインドします。
ここで指定する名称はVBコード内のクラスで定義するプロパティ名です。
(5)<controls:Pivot>要素のx:Nameに「Pivot1」と指定しておきます。
(6)<controls:Pivot >要素の、最初の子要素<controls:PivotItem>のHeaderプロパティに、「データ入力」と指定します。中に<Grid>要素を配置し、Background(背景色)にRedを指定します。項目名となる<TextBlock>を5個、入力ボックスとなる<TextBox>を4個、<Image>を1個、<Button>コントロールを2個配置します。NameがsaveButton(保存ボタン)は、初期状態ではIsEnbaledのチェックを外し、クリック不可としておきます。
<Image>要素のSourceプロパティには、初期状態で、Imageフォルダー内の「未設定.jpg」を指定しておきます。
(7)2番目のPivot itemの<controls:PivotItem>要素のHeaderプロパティに「画像選択」と指定します。子要素として<ListBox>要素を配置します。ItemTemplateで(3)で定義したListBoxTemplateを参照します。
(8)3番目のPivot itemの<controls:PivotItem>要素のHeaderプロパティに「データ一覧」と指定します。中に、<Grid>要素を配置して、Background(背景色)にRedを指定します。子要素として<ListBox>要素を配置します。ItemTemplateで(4)で定義したdataListBoxTemplateを参照します。
全て設定すると図2のようになります。各コントロールのNameで表示しています。
<phone:PhoneApplicationPage
    x:Class="ImageAndPersonalInfo.MainPage"
    xmlns="http://schemas.microsoft.com/winfx/2006/xaml/presentation"
    xmlns:x="http://schemas.microsoft.com/winfx/2006/xaml"
    xmlns:phone="clr-namespace:Microsoft.Phone.Controls;assembly=Microsoft.Phone"
    xmlns:shell="clr-namespace:Microsoft.Phone.Shell;assembly=Microsoft.Phone"
    xmlns:controls="clr-namespace:Microsoft.Phone.Controls;assembly=Microsoft.Phone.Controls"
    xmlns:d="http://schemas.microsoft.com/expression/blend/2008"
    xmlns:mc="http://schemas.openxmlformats.org/markup-compatibility/2006"
    mc:Ignorable="d" d:DesignWidth="480" d:DesignHeight="768"
    d:DataContext="{d:DesignData SampleData/MainViewModelSampleData.xaml}"
    FontFamily="{StaticResource PhoneFontFamilyNormal}"
    FontSize="{StaticResource PhoneFontSizeNormal}"
    Foreground="{StaticResource PhoneForegroundBrush}"
    SupportedOrientations="Portrait"  Orientation="Portrait"
    shell:SystemTray.IsVisible="True"  xmlns:toolkit="clr-namespace:Microsoft.Phone.Controls;assembly=Microsoft.Phone.Controls.Toolkit" ■(1)
  Language=”ja-JP”>  ■(2)

    <toolkit:TransitionService.NavigationInTransition> ■(1)
      <toolkit:NavigationInTransition>
        <toolkit:NavigationInTransition.Backward>
          <toolkit:TurnstileTransition Mode="BackwardIn"/>
        </toolkit:NavigationInTransition.Backward>
        <toolkit:NavigationInTransition.Forward>
          <toolkit:TurnstileTransition Mode="ForwardIn"/>
        </toolkit:NavigationInTransition.Forward>
      </toolkit:NavigationInTransition>
    </toolkit:TransitionService.NavigationInTransition>
    <toolkit:TransitionService.NavigationOutTransition>
      <toolkit:NavigationOutTransition>
        <toolkit:NavigationOutTransition.Backward>
          <toolkit:TurnstileTransition Mode="BackwardOut"/>
        </toolkit:NavigationOutTransition.Backward>
        <toolkit:NavigationOutTransition.Forward>
          <toolkit:TurnstileTransition Mode="ForwardOut"/>
        </toolkit:NavigationOutTransition.Forward>
      </toolkit:NavigationOutTransition>
    </toolkit:TransitionService.NavigationOutTransition> ■(1)

    <phone:PhoneApplicationPage.Resources> ■(3)
      <DataTemplate x:Key="ListBoxTemplate"> ■(3)
        <Image Source="{Binding 画像名}" Width="320" Height="240" Margin="10"/>
      </DataTemplate>

      <DataTemplate x:Key="dataListBoxTemplate"> ■(4)
        <StackPanel Orientation="Horizontal">
          <Image Source="{Binding 画像}" Width="80" Height="60" Margin="10"/>
          <TextBlock Text="{Binding 氏名}" TextWrapping="Wrap" FontSize="28" Foreground="Gold" VerticalAlignment="Center"/>
        </StackPanel>
      </DataTemplate>
    </phone:PhoneApplicationPage.Resources>
      <!--LayoutRoot は、全てのページ コンテンツが配置されるルート グリッドです-->
    <Grid x:Name="LayoutRoot" Background="Transparent">
      <!--ピボット コントロール-->
      <controls:Pivot Title="MY APPLICATION" x:Name=”Pivot1”> ■(5)
        <!--ピボット アイテム 1-->
        <controls:PivotItem Header="データ入力"> ■(6)
          <Grid Background=”Red”> ■(6)
            <TextBlock Height="45" HorizontalAlignment="Left" Name="nameTextBlock" Text="氏名" VerticalAlignment="Top" Width="64" FontSize="26" FontWeight="Bold" Margin="17,20,0,0" />
            <TextBlock Height="45" HorizontalAlignment="Left" Name="addressTextBlock" Text="住所" VerticalAlignment="Top" Width="64" FontSize="26" FontWeight="Bold" Margin="21,94,0,0" />
            <TextBlock Height="45" HorizontalAlignment="Left" Name="telTextBlock" Text="電話" VerticalAlignment="Top" Width="64" FontSize="26" FontWeight="Bold" Margin="18,171,0,0" />
            <TextBlock Height="45" HorizontalAlignment="Left" Name="mailTextBlock" Text="E-mail" VerticalAlignment="Top" Width="83" FontSize="26" FontWeight="Bold" Margin="15,240,0,0" />
            <TextBlock Height="45" HorizontalAlignment="Left" Name="imageTextBlock" Text="画像" VerticalAlignment="Top" Width="83" FontSize="26" FontWeight="Bold" Margin="18,371,0,0" />
            <TextBox Height="80" HorizontalAlignment="Left" Margin="108,6,0,0" Name="nameTextBox" VerticalAlignment="Top" Width="300" />
            <TextBox Height="80" HorizontalAlignment="Left" Margin="107,79,0,0" Name="addressTextBox" VerticalAlignment="Top" Width="334" />
            <TextBox Height="80" HorizontalAlignment="Left" Margin="106,150,0,0" Name="telTextBox" VerticalAlignment="Top" Width="300" />
            <TextBox Height="80" HorizontalAlignment="Left" Margin="106,227,0,0" Name="mailTextBox" VerticalAlignment="Top" Width="343" />
            <Image Height="120" HorizontalAlignment="Left" Margin="114,333,0,0" Name="Image1" Stretch="Fill" VerticalAlignment="Top" Width="160" Source="/ImageAndPersonalInfo;component/Image/未設定.jpg" />
            <Button Content="保存" Height="85" HorizontalAlignment="Right" Margin="0,495,12,0" Name="saveButton" VerticalAlignment="Top" Width="224" IsEnabled="False" />
            <Button Content="OK" Height="83" HorizontalAlignment="Left" Margin="16,496,0,0" Name="okButton" VerticalAlignment="Top" Width="206" />
          </Grid>
        </controls:PivotItem>

      <!--ピボット アイテム 2-->
      <controls:PivotItem Header="画像選択">  ■(7)
        <!--テキストの折り返しを行わない 3 行リスト-->
          <ListBox x:Name="imageListBox" Margin="0,0,-12,0" ItemTemplate="{StaticResource ListBoxTemplate}"/> ■(7)
      </controls:PivotItem>

      <controls:PivotItem Header="データ一覧">  ■(8)
        <!--テキストの折り返しを行わない 3 行リスト-->

        <Grid Background=”Red”>
          <ListBox x:Name="dataListBox" Margin="0,0,-12,0" ItemTemplate="{StaticResource dataListBoxTemplate}"/> ■(8)
        </Grid>
      </controls:PivotItem>
    </controls:Pivot>
  </Grid>
~コード略~
</phone:PhoneApplicationPage>
|
|
| 図2:各ページにコントロールの配置されたPivotの画面(クリックで拡大) |

「データを保存し氏名から詳細情報を表示する」サンプルプログラム